USB devices are convenient for transferring files, but they pose a significant data security risk in enterprise environments. Using Microsoft Intune and Endpoint Manager, administrators can enforce policies that block or restrict USB usage to protect sensitive information. In this guide, we’ll walk through how to deny write access to USB devices using Intune Catalog Settings, and explore additional configurations available under Administrative Templates → System → Removable Storage Access. These policies help organizations strengthen endpoint security, enforce data protection, and maintain compliance with corporate standards.
Create a Device Configuration Profile
This requirement can be implemented by creating a Device Configuration Profile in Microsoft Intune. Follow the step‑by‑step instructions below to configure the profile and deny write access to USB devices using Intune Catalog Settings. This approach ensures consistent enforcement of endpoint security policies across all managed devices.
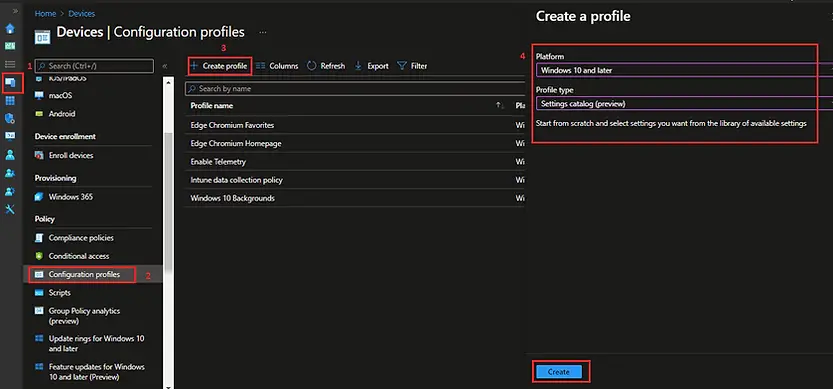
Step 1: Create Device configuration Profile
Sign in to the Microsoft Intune Admin Center.
Select Devices > Configuration profiles > Create profile.
Enter the following details:
- Platform: Select Windows 10 and later.
- Profile type: Select Setting Catalog and click on Create
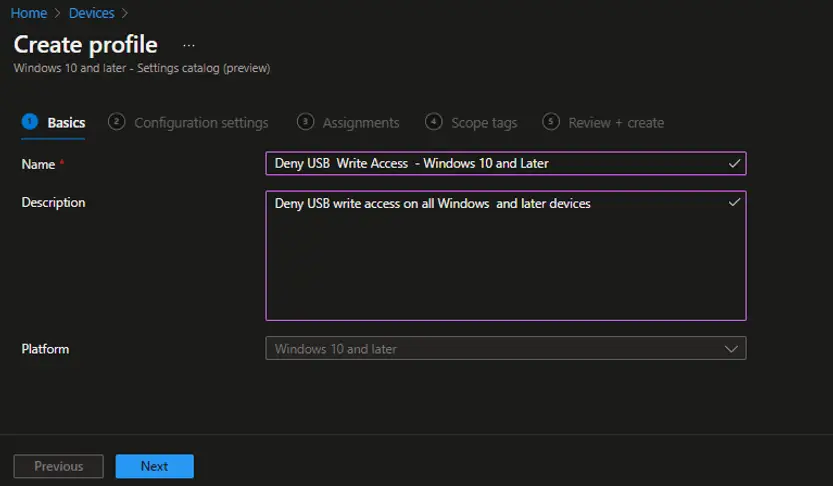
In the Basics page, enter the following details:
- Name: Enter a descriptive name for the profile. For example, enter Deny Write Access to USB Devices
- Description: Enter a description for the profile.
Select Next.
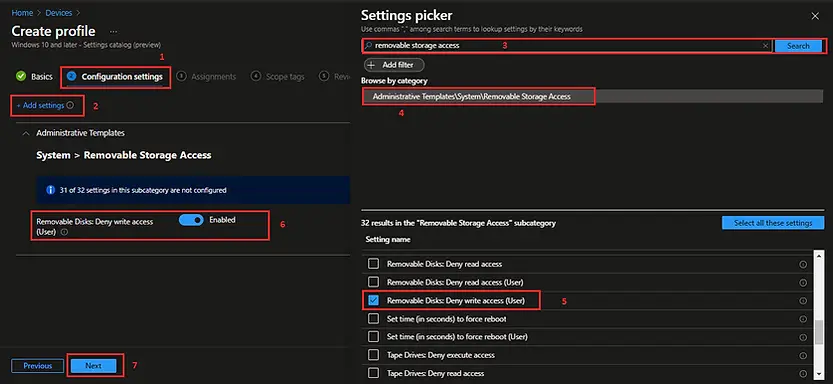
Step 2: Add the settings for Removable Storage Access
In Configuration settings, click on Add settings
In the Settings picker window, type Removable Storage Access into the search bar. From the search results, select Administrative Templates → System → Removable Storage Access. This section contains policies that allow you to control how users interact with USB drives, external disks, and other removable media, enabling administrators to enforce Intune security policies and strengthen endpoint data protection.
Select the setting below from the list.
Removable Disk: Deny Write Access (User)
Enable Removable Disks: Deny write access setting.
Step 3: Assign the Policy
On the Assignments page, select the Azure AD group that you want to target with this Device Configuration Profile. This ensures the USB write‑access restriction is applied to all devices within that group. If you need to implement an exception process, add the group you want to exclude from the policy assignment. This approach allows you to enforce Intune security policies while maintaining flexibility for specific users or devices that require access.

On the Review + Create page, carefully verify all the configuration settings you have defined in the Device Configuration Profile. Ensure that the targeted groups, USB restrictions, and any exclusions are correctly applied. Once you have confirmed the details, click Create to finalize the profile. The policy will then be deployed through Intune, enforcing the USB write‑access restriction across assigned devices.
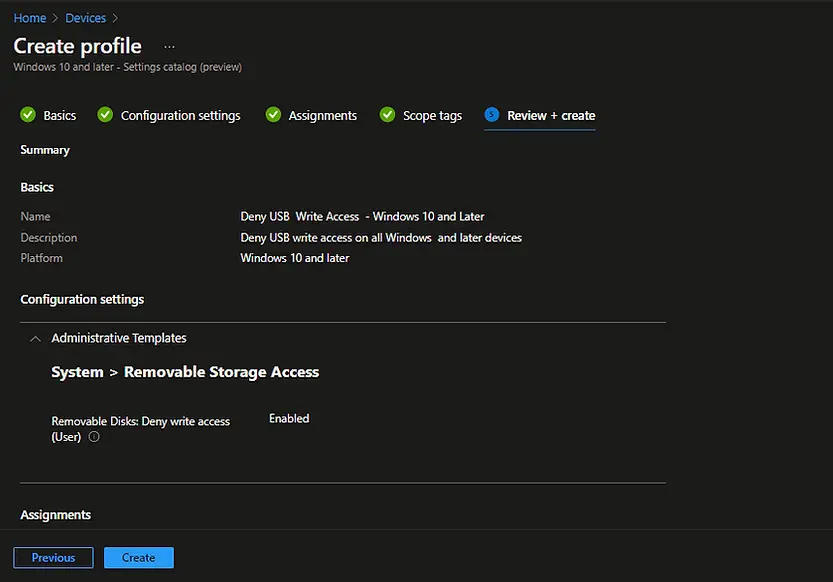
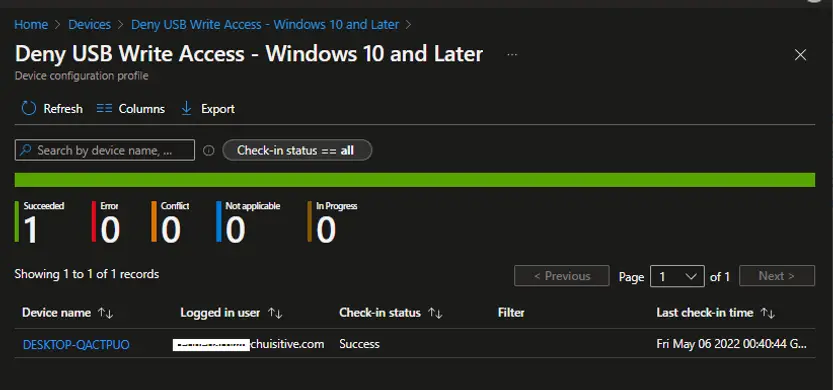
The Device Configuration Profile has now been successfully created. To verify deployment, click on the profile name in the Intune Endpoint Manager console. From there, you can view the assignment status, check which Azure AD groups are targeted, and confirm whether the USB write‑access restriction policy has been applied to the assigned devices. This ensures that your Intune security configuration is enforced consistently across the environment.
End User Experience
When a user attempts to copy files to a USB device or other removable media, the action will be blocked by the applied Intune policy. Instead of completing the transfer, the system will display an error message notifying the user that write access to removable storage has been denied. This ensures that sensitive data cannot be copied to external drives, reinforcing your organization’s endpoint security and data protection policies.
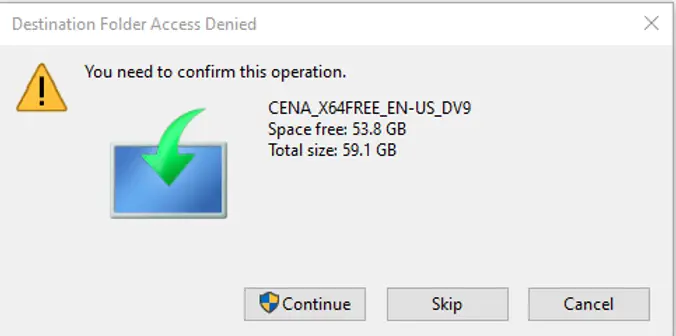
If the user clicks Continue after the initial warning, a secondary message will appear indicating that write access to removable storage has been denied. This reinforces the applied Intune policy and ensures that attempts to copy files to USB devices or other removable media remain blocked. By displaying this follow‑up message, the system provides clear feedback to the end user while maintaining strict endpoint security and data protection compliance.

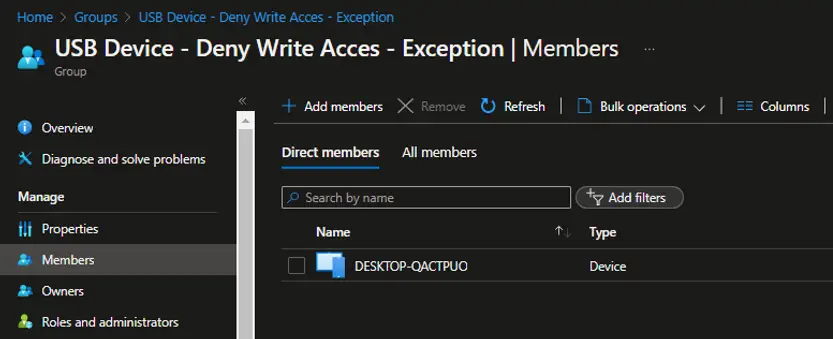
How to Manage Exceptions
As explained earlier, exceptions can be managed through Azure AD groups. To allow certain devices or users to bypass the USB write‑access restriction, add the dedicated Azure AD group to the Assignments page → Exclude section. Any device that is a member of this group will be excluded from the policy, meaning the USB write permission will remain enabled for those devices.
To maintain compliance, define a clear process for adding and removing devices from the exception group in line with your organization’s security policy. Devices should be removed from the group once their exception period has ended, ensuring that the Intune security policy continues to enforce USB restrictions consistently across the environment.
Additional Settings Under Administrative Template > System > Removable Storage Access
Beyond denying write access, you can configure several other useful restrictions, such as:
- Removable Disks: Deny Read Access
Prevents users from opening or reading files stored on USB drives. - Removable Disks: Deny Execute Access
Blocks applications from running directly from USB media, reducing malware risks. - CD and DVD: Deny Read/Write Access
Restricts access to optical drives, useful in secure environments where removable media is prohibited. - WPD Devices: Deny Read/Write Access
Controls access to portable devices (e.g., smartphones, cameras) connected via USB. - Custom Exceptions
Use Azure AD groups to exclude specific devices or users from restrictions when there’s a legitimate business need.
Related Posts:
- Block USB Device Access with Exceptions | Microsoft Intune
- Deny Write Access to USB Devices Using Intune Catalog Settings
- Manage Windows Local Administrator Password with Intune & Windows LAPS
- Check OS Version Compliance with Device Compliance Policy & Notify User | Microsoft Intune
- How to manage the local administrators group on Azure AD joined devices | Intune
Subscribe to Techuisitive Newsletter
Be the first to know about our new blog posts. Get our newsletters directly in your inbox and stay up to date about Modern Desktop Management technologies & news.