
Microsoft Intune provides powerful capabilities to keep devices compliant and secure. One of the most useful features is detection and remediation scripts that allow us to use small PowerShell scripts to check for issues and automatically fix them.
If you’re new to Intune automation, start here. Once you understand how to create scripts manually, you can move on to my automation guide using the Microsoft Graph API to streamline deployments across environments.
What Are Detection and Remediation Scripts?
- Detection Script checks for a condition (e.g., outdated software, missing registry key).
- Remediation Script fixes the issue if detected (e.g., installs an update, adds a registry key). Together, they help admins enforce compliance and reduce manual troubleshooting.
Prerequisites
- Access to Microsoft Intune Admin Center
- Basic knowledge of PowerShell
- A test group of devices (recommended before production rollout)
Prepare the Detection and Remediation Scripts
Create a Detection Script
Before creating the remediation package, you need a PowerShell detection script. This script determines whether a device is compliant by evaluating a specific condition and returning an appropriate exit code.
- Exit code 0 – The device is compliant. Intune does not run the remediation script.
- Exit code 1 – The device is non-compliant. Intune automatically runs the associated remediation script (if one is configured).
In the following example, the detection script checks whether the installed Google Chrome version is earlier than 125.0.0.0. If Chrome is running version 125.0.0.0 or later, the script returns exit code 0. Otherwise, it returns exit code 1, allowing Intune to trigger the remediation script and perform the required corrective action.
# Detection Script: Check Chrome version with logging

$logFolder = "C:\ProgramData\IntuneRemediation"
$logFile   = Join-Path $logFolder "DetectionLog.txt"

# Ensure log folder exists
if (!(Test-Path $logFolder)) {
    New-Item -ItemType Directory -Path $logFolder -Force | Out-Null
}

function Write-Log {
    param([string]$Message)
    $timestamp = Get-Date -Format "yyyy-MM-dd HH:mm:ss"
    Add-Content -Path $logFile -Value "$timestamp - $Message"
}

$chromePath = "C:\Program Files\Google\Chrome\Application\chrome.exe"

if (Test-Path $chromePath) {
    $version = (Get-Item $chromePath).VersionInfo.ProductVersion
    Write-Log "Chrome detected. Version: $version"

    if ($version -lt "125.0.0.0") {
        Write-Output "NonCompliant"
        Write-Log "Result: NonCompliant (Version below 125.0.0.0)"
        exit 1
    } else {
        Write-Output "Compliant"
        Write-Log "Result: Compliant"
        exit 0
    }
} else {
    Write-Output "NotInstalled"
    Write-Log "Result: NotInstalled (Chrome not found)"
    exit 1
}
Create a Remediation Script
After creating the detection script, the next step is to create the PowerShell remediation script. This script runs only when the detection script returns exit code 1, indicating that the device is non-compliant.
The remediation script should contain the actions required to bring the device back into the desired state. Depending on your scenario, it might install or update an application, modify a registry value, restart a service, or change a configuration setting.
In the following example, the remediation script upgrades Google Chrome to the required version if the installed version is earlier than 125.0.0.0. After the remediation completes, the detection script runs again during the next scheduled execution to verify that the device is now compliant.
# Remediation Script: Install latest Chrome with logging

$logFolder = "C:\ProgramData\IntuneRemediation"
$logFile   = Join-Path $logFolder "RemediationLog.txt"

# Ensure log folder exists
if (!(Test-Path $logFolder)) {
    New-Item -ItemType Directory -Path $logFolder -Force | Out-Null
}

function Write-Log {
    param([string]$Message)
    $timestamp = Get-Date -Format "yyyy-MM-dd HH:mm:ss"
    Add-Content -Path $logFile -Value "$timestamp - $Message"
}

try {
    $installer = "$env:TEMP\ChromeSetup.exe"
    $url = "https://dl.google.com/chrome/install/latest/chrome_installer.exe"

    Write-Log "Starting remediation. Downloading Chrome installer from $url"
    Invoke-WebRequest -Uri $url -OutFile $installer -ErrorAction Stop
    Write-Log "Download complete: $installer"

    Write-Log "Starting silent installation..."
    Start-Process -FilePath $installer -Args "/silent /install" -Wait
    Write-Log "Installation completed successfully."

    Remove-Item $installer -Force
    Write-Log "Installer removed from $installer"
}
catch {
    Write-Log "Error occurred: $($_.Exception.Message)"
    exit 1
}
Deploy the Remediation Script in Microsoft Intune
- Sign in to Microsoft Intune Admin Center.
- Navigate to: Devices > Windows > Script and Remediation
- Select +Create
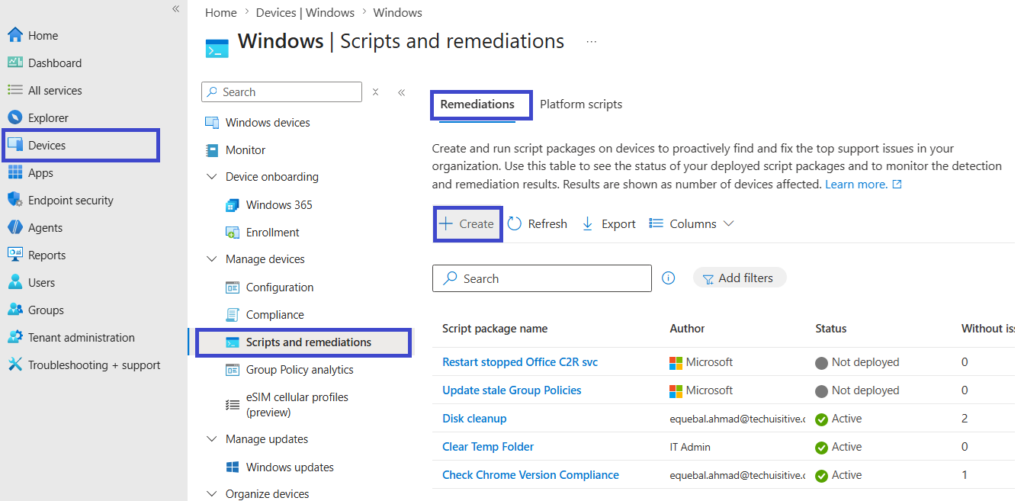
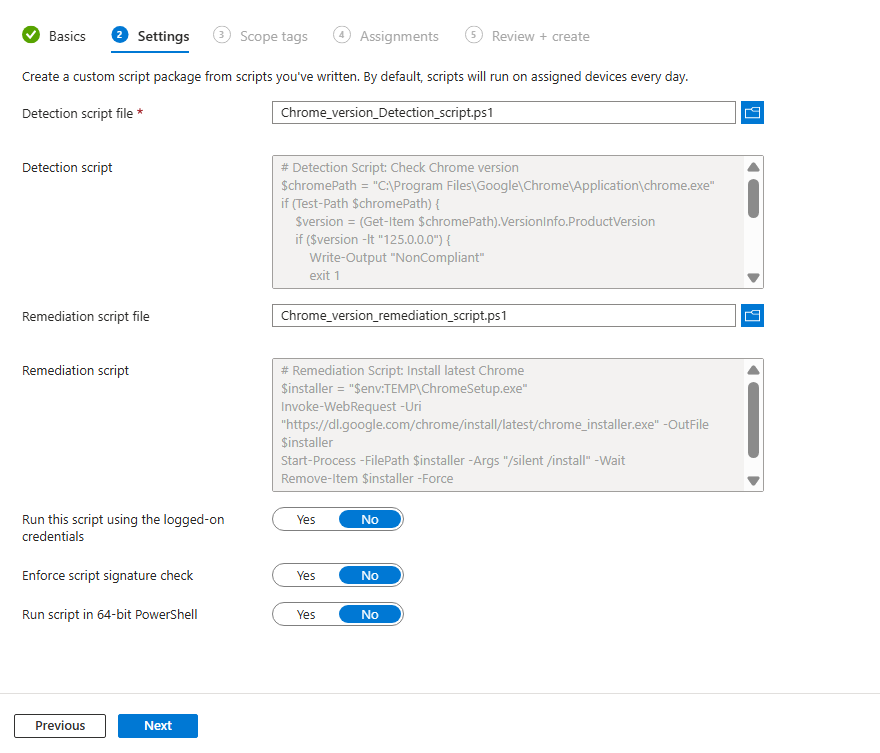
On the Settings page, complete the following steps:
- Click Browse under Detection script file and select the PowerShell detection script.
- Click Browse under Remediation script file and select the PowerShell remediation script.
- Configure the following options based on your organization’s requirements:
- Run this script using the logged-on credentials – Choose whether the script should run in the context of the signed-in user or the SYSTEM account.
- Enforce script signature check – Enable this option to run only digitally signed PowerShell scripts.
- Run script in 64-bit PowerShell – Enable this option if your script requires a 64-bit PowerShell environment (recommended for most Windows devices).
After configuring the required settings, click Next to proceed to the Assignments page.
- On the Assignments page, select the Microsoft Entra user or device groups that should receive the remediation package. You can assign the package to one or more groups depending on your deployment requirements. Next, configure the Schedule by choosing whether the scripts should run Once, Hourly, or Daily, and specify the execution time or interval. After reviewing the assignment and schedule settings, click Next.
- On the Review + create page, verify that all the configured settings are correct, including the remediation package name, uploaded detection and remediation scripts, assignments, and schedule. If any changes are required, click Previous to return to the relevant page and update the configuration. Once you have confirmed the settings, click Create to deploy the remediation package. Intune will begin distributing the scripts to the targeted devices based on the configured schedule.
Validate the Remediation Results
After the remediation package has been deployed, verify that it is working as expected by reviewing the execution results in the Microsoft Intune admin center. Navigate to Devices > Scripts and remediations, select your remediation package, and review the available reports to confirm whether the detection and remediation scripts executed successfully on the targeted devices.
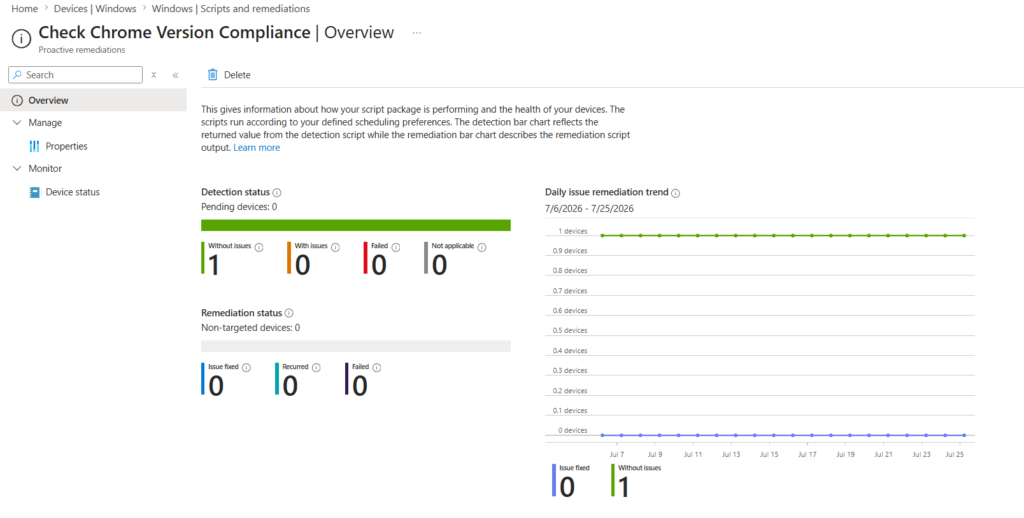
Check the detection status, remediation status, and any error messages reported for individual devices. If remediation was triggered, verify that the issue has been resolved by confirming that the device is now reported as compliant during the next detection cycle.
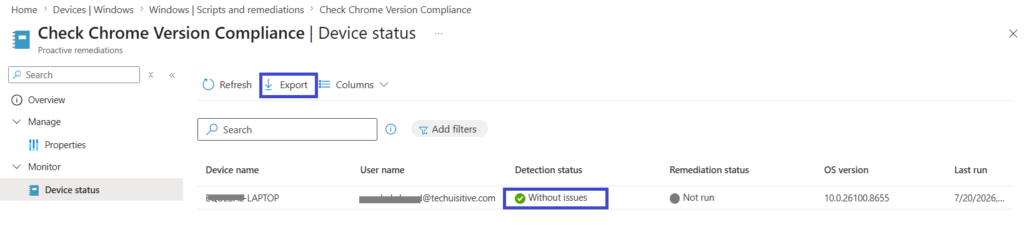
If the scripts do not produce the expected results, review the execution logs and PowerShell output to identify the root cause. Common issues include incorrect file paths, registry locations, missing permissions, or script logic errors. Update the detection or remediation script as required, redeploy the package, and validate the results again until the remediation works reliably across all targeted devices.
Best Practices for Intune Remediation Scripts
To ensure your remediation scripts are reliable, secure, and easy to maintain, follow these best practices:
Keep scripts lightweight and efficient – Detection and remediation scripts should perform only the tasks necessary to evaluate or correct the issue. Avoid complex logic or long-running operations that can increase execution time and consume device resources.
Implement logging and error handling – Use PowerShell logging (such as Write-Output or transcript logging where appropriate) and proper error handling to capture execution details. Well-written logs make it easier to troubleshoot failures and verify that the remediation completed successfully.
Test in a pilot group first – Before deploying scripts to production, assign them to a small pilot group of devices. Validate that the detection logic correctly identifies non-compliant devices and that the remediation script resolves the issue without introducing unintended side effects.
Avoid hard-coded values – Use variables, parameters, or configurable values instead of hard-coding file paths, registry keys, URLs, or application versions. This makes your scripts easier to update, reuse, and maintain across different environments.
Make scripts idempotent – Design remediation scripts so they can run multiple times without causing errors or making unnecessary changes. A well-written remediation script should safely verify the current state before applying any modifications.
Follow the principle of least privilege – Run scripts with the minimum permissions required to perform the task. If SYSTEM context is not necessary, consider using the logged-on user context where appropriate to reduce security risks.
By following these best practices, you can create remediation scripts that are easier to troubleshoot, safer to deploy, and more reliable across your Microsoft Intune-managed Windows devices.
Next Steps: Automate with Graph API
Once you’re comfortable creating scripts manually, you can automate the process using Microsoft Graph API. This allows bulk deployment, version control, and integration with CI/CD pipelines.
👉 Read my full guide: Automate Intune Remediation Script Creation with PowerShell and Graph API.
✅ Conclusion
Detection and remediation scripts are a simple but powerful way to enforce compliance in Intune. By following this step‑by‑step guide, you can start small, test safely, and then scale with automation.
💡 Have a favorite detection/remediation use case? Share it in the comments—I’d love to feature real‑world scenarios in future posts.
Related Posts
- Automating Intune Remediation Script Creation with Microsoft Graph API
- Automating Intune Reports Using PowerShell and Microsoft Graph API
- The Remediation Playbook: How Intune Admins Can Automate Fixes in 2026
Explore More Intune Guides
Continue building your Microsoft Intune skills with step-by-step tutorials covering device management, application deployment, automation, and troubleshooting.
- Microsoft Intune Learning – Explore comprehensive guides on device enrollment, compliance policies, application deployment, Windows updates, and more.
- Intune Automation – Discover PowerShell and Microsoft Graph automation solutions to simplify repetitive Intune administration tasks.
