The cloud management gateway (CMG) provides a simple way to manage Configuration Manager client over internet.
In the previous posts we discussed about CMG prerequisites, server authentication certificate requirement for CMG, client authentication certificate reqiurment, SSL configuration for ConfigMgr site and ConfigMgr site integration with Azure Active Directory.
In this post, we will discuss about creating Cloud Management Gateway, adding CMG connection point site system role, configuring other CMG and client related settings.
Post in this series:
- Part 1 | Cloud Management Gateway (CMG) Setup Guide
- Part 2 | Issue, Enroll & Export Server Authentication Certificate
- Part 3 | Configure SCCM Site for SSL
- Part 4 | Integrate Azure Active Directory with ConfigMgr
- Part 5 | Setup Cloud Management Gateway
- Part 6 | Validate CMG Health & Client Communication
Create Cloud Management Gateway
Go to Configuration Manager console Administration/Features and ensure Cloud management gateway with Azure VM scale set is turned on.

Go to the Administration > Cloud Services > Cloud Management Gateway, right click on Cloud Management Gateway and select Create Cloud Management Gateway

Sign-in with Azure Administrator rights. The Azure AD App name should be auto-populated, click Next

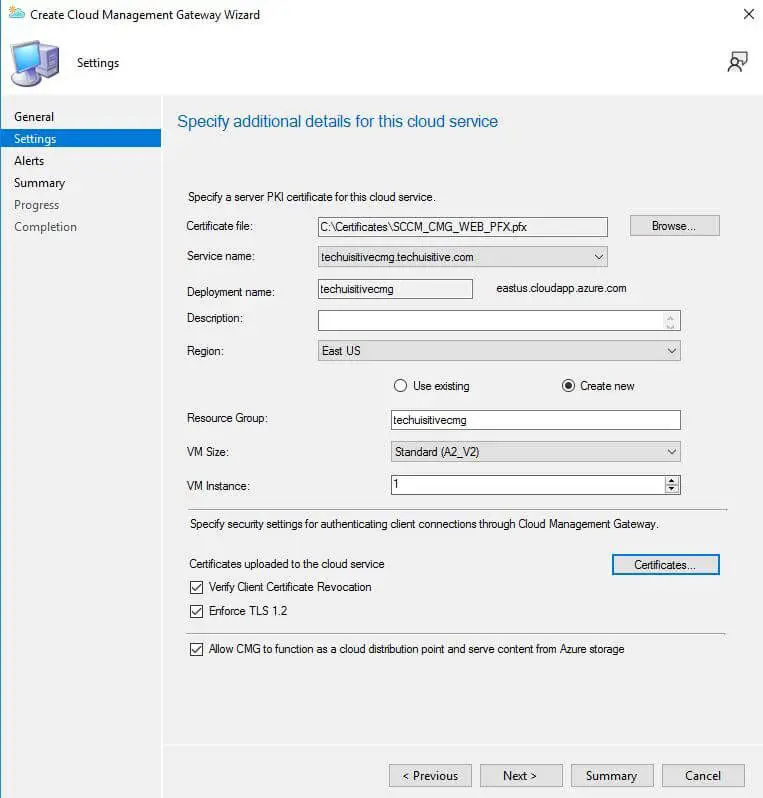
On the Specify additional details for this cloud services page
Specify a server PKI certificate for the cloud service:
- Certificate file : Click on Browse and select the server authentication certificate you exported for CMG.
- Service name will populate automatically based on CNAME/Alternative DNS name provided in certificate.
- Select correct region
- Validate deployment name (serviceprefix.region.cloudapp.azure.com)
- Resource Group: Create new one
- VM Instances: 1
Specify security settings for authenticating client connections through Cloud Management Gateway:
- Click on the certificate and Upload PKI trusted root certificate you have exported earlier. Refer Export Trusted Root Certificate
- Select Verify client certificate revocation
Select “Allow CMG to function as a cloud distribution point and serve content from Azure storage”
Click on Next
In the Alert page, leave the default settings and click on Next.
Review the details in Summary page and click on Next to complete the tasks.

In Completion page, click on Close.

You can now see the Cloud Management Gateway service name in console. The Status will change to Ready once provisioning completed.

Add CMG connection Point Site System Role
Cloud Management Gateway connection point manage all communication between ConfigMgr on premises infrastructure and Cloud Management Gateway service hosted in Microsoft Azure. Follow the below steps to add a Cloud Management Gateway Connection Point site system role.
In the SCCM console, go to Administration > Site Configuration > Servers and Site system roles > select and right click on Site system server > Add site system roles

Click on Next twice to got to System Role Section page. Select Cloud Management Gateway Connection Point and click on Next

Select Cloud Management Gateway name and Region and click on Next

Confirm the settings and click on Next to finish.

In the Completion page, click on Close.

Go to Cloud Management Gateway and select CMG service Name. Check if Cloud connection point role status is Connected

Configure Management Point to Allow CMG Traffic
The Management Point need to be configured to allow Cloud Management Gateway traffic.
- Go to Configuration Manager console / Administration / Site configuration / Servers and site system role
- Select Site system with the Management Point role which you want to use for CMG
- Right click on Management Point and select Properties
- Ensure following settings are configured to allow internet traffics through CMG
- Select Allow Configuration Manager cloud management gatway traffic
- Select Allow intranet and internet connections if you want to use this management point for both internet and intranet clients
- Select Allow internet only communication if you want to use this management point for internet clients only. You must have another management point to support intranet clients if selecting this option.

Configure Software Update Point to Allow CMG Traffic
The Software Update Point need to be configured to allow Cloud Management Gateway traffic.
- Go to Configuration Manager console / Administration / Site configuration / Servers and site system role
- Select Site system with the Software Update Point role which you want to use for CMG
- Right click on Software Update Point and select Properties
- Ensure following settings are configured to allow internet traffics through CMG
- Select Allow Configuration Manager cloud management gatway traffic
- Select Allow Internet and intranet client connections if you want to use this management point for both internet and intranet clients
- Select Allow internet only client connections if you want to use this software update point for internet clients only. You must have another software update point to support intranet clients if selecting this option.

Configure Client Settings
In the SCCM console, go to Administration > Client Settings, select client settings name and go to Properties
Configure Following settings
Cloud Services
Enable client to use a cloud management gateway – Yes
Allow access to cloud distribution point – Yes

Client Policy
Enable user policy requests from Internet client – Yes

Nex post : Part 6 | Validate CMG Health & Client Communication
Related posts:
- Configure Management Point for HTTPS | ConfigMgr | SCCM
- Configure Software Update Point for SSL | ConfigMgr | SCCM
- Deploy client authentication certificate for SCCM clients
- SCCM CMG Part 1 | Cloud Management Gateway (CMG) Setup Guide
- SCCM CMG Part 2 | Issue, Enroll & Export Server Authentication Certificate
- SCCM CMG Part 3 | Configure SCCM Site for SSL
- SCCM CMG Part 4 | Integrate Azure Active Directory with ConfigMgr
- SCCM CMG Part 5 | Setup Cloud Management Gateway
- SCCM CMG Part 6 | Validate CMG Health & Client Communication
- Location of smsts.log file during Operating System Deployment (OSD)
- Schedule SCCM Client Reboot through ConfigMgr
- Check Software Center Business Hours of Remote Computer
- SCCM Software deployment strategy
- How to deal with wrong deployment in ConfigMgr
- How to Initiate SCCM client agent actions using PowerShell
Subscribe to Techuisitive Newsletter
Be the first to know about our new blog posts. Get our newsletters directly in your inbox and stay up to date about Modern Desktop Management technologies & news.