Windows Autopilot Device Preparation, also known as Autopilot v2, is Microsoft’s latest evolution in device provisioning. Unlike the traditional Autopilot process, this streamlined approach eliminates the need to import hardware hashes, relying instead on the device serial number to identify corporate devices. This guide walks you step‑by‑step through configuring Autopilot Device Preparation, helping IT admins simplify deployment, accelerate setup, and ensure a clean, secure onboarding experience for end users.
When using Windows Autopilot Device Preparation (Autopilot v2), the device must not be registered with the traditional Windows Autopilot service. If the device is already registered, you must deregister it first. Otherwise, the existing Autopilot policy will take precedence, preventing the Device Preparation profile from applying correctly.
- Requirements
- Set up Windows automatic Intune enrollment
- Allow users to join devices to Microsoft Entra ID
- Create a Device Group for Windows Autopilot Device Preparation
- Create a User Group to Assign Device Preparation Policy
- Assign applications and PowerShell scripts to the device group
- Create a Windows Autopilot device preparation policy
- Add a Windows device to the corporate device identifier
- Reset Device to Factory Settings
- End User Experience
- Monitoring & Troubleshooting Autopilot Device Preparation
- Classic Autopilot vs. Autopilot Device Preparation (v2)
- Conclusion
- Frequently Asked Questions (FAQs)
- Related Posts
Requirements
Operating System
- Windows 11, version 23H2 with update KB5035942 or later
- Windows 11, version 22H2 with update KB5035942 or later
Identity
- Only Microsoft Entra ID join is supported (Azure AD join).
Device Registration
- The device must not be registered or added as a Windows Autopilot device.
- If a device is already registered with Autopilot, the Autopilot profile takes precedence over the Autopilot Device Preparation policy.
Set up Windows automatic Intune enrollment
Automatic enrollment enables users to seamlessly enroll their Windows devices into Microsoft Intune. When a device joins Microsoft Entra ID (Azure AD), it is automatically enrolled in Intune, ensuring centralized management, security policies, and compliance are applied without requiring manual steps.
Follow the steps below to configure Automatic MDM enrollment from the Entra ID.
- Sign in to the Azure portal, and select Microsoft Entra ID> Mobility (MDM and MAM) > Microsoft Intune.
- Configure MDM user scope. If you select Some, then you need to choose an Azure AD Group.
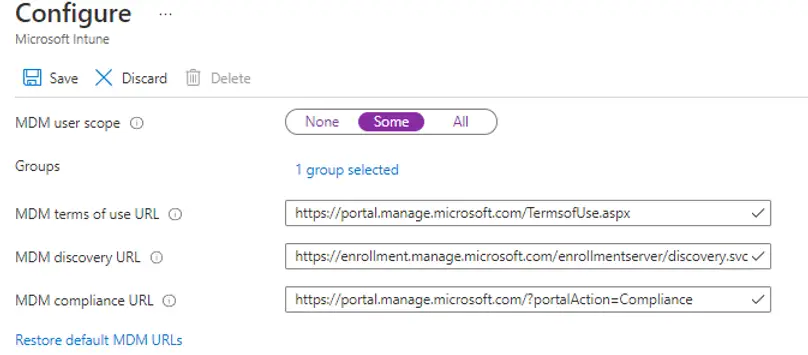
Note: MDM user scope must be set to an Azure AD group that contains user objects.
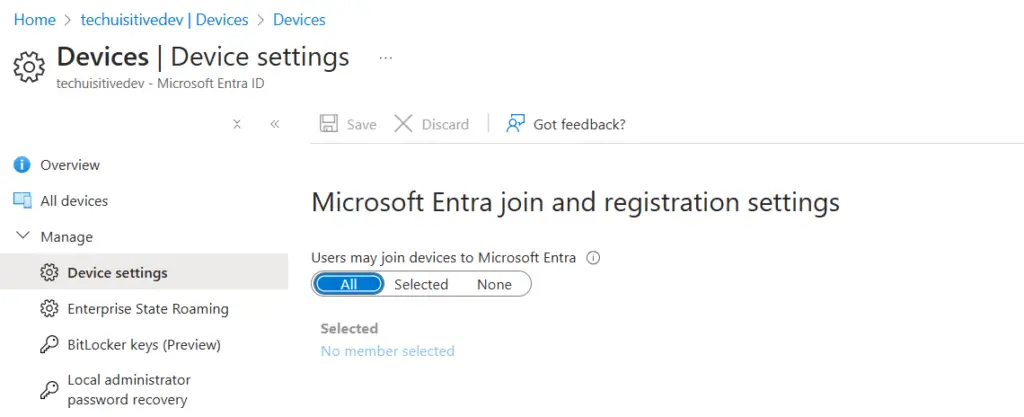
Allow users to join devices to Microsoft Entra ID
The user must be able to join a device to Microsoft Entra ID.
To enable this setting:
Ensure that Microsoft Entra join is enabled for your organization.
Sign in to the Azure portal.
Navigate to Entra ID → Devices → Device settings.
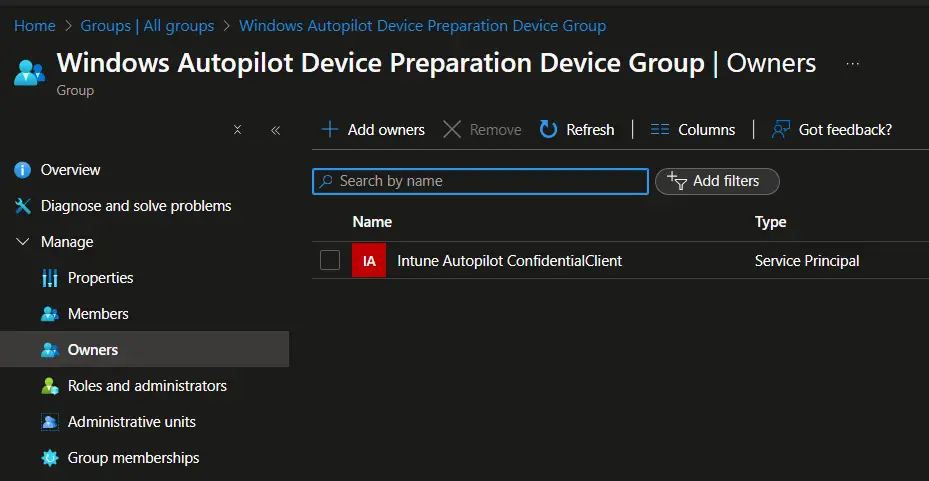
Create a Device Group for Windows Autopilot Device Preparation
Windows Autopilot Device Preparation uses a device group as part of the policy. During deployment, devices are automatically added to this group.
To ensure proper functionality:
The Intune Provisioning Client service principal (AppId: f1346770-5b25-470b-88bd-d5744ab7952c) must be configured as the owner of this device group.
Steps to Configure
Follow the steps below to create a device group and assign ownership:
- Sign in to the Microsoft Intune admin center and navigate to Groups.
- in the Groups | All Groups page, click on New Group and provide the following details.
- Group type: Security
- Group Name: Windows Autopilot Device Preparation – Device Group
- Group description: Enter an appropriate description for the group
- Microsoft Entra roles can be assigned to the group: No
- Membership type: Assigned
- Owners: Click on No Owners Selected link.
- In the Add owners screen that opens:
- Search for Intune Provisioning Client / Intune Autopilot ConfidentialClient with AppId of f1346770-5b25-470b-88bd-d5744ab7952c and select the same from the result.
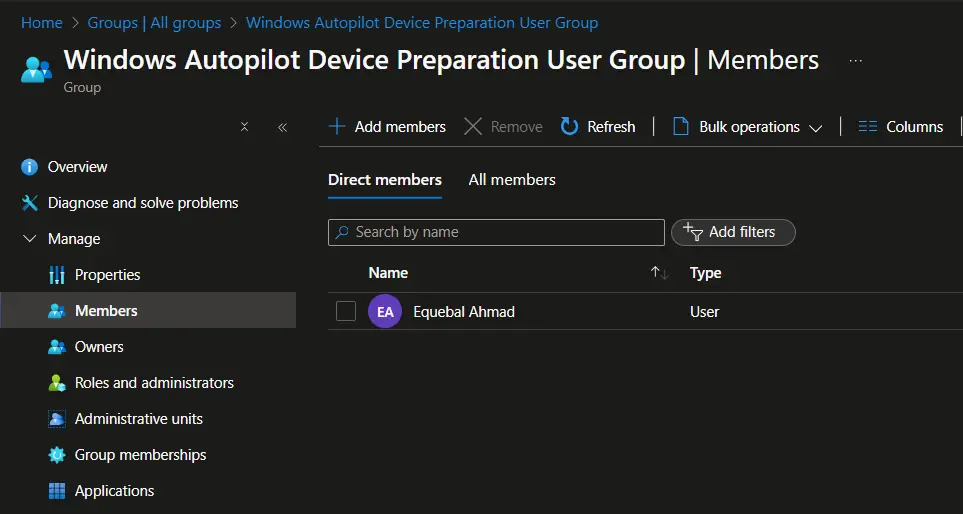
Create a User Group to Assign Device Preparation Policy
Windows Autopilot Device Preparation requires a user group as part of the deployment policy. Members of this group automatically receive the Autopilot Device Preparation deployment during setup. The specified user group must be a security group, which can be configured as either an assigned group or a dynamic group, depending on your organizational needs.
Follow the steps below to create a user group for Windows Autopilot Device Preparation.
- Sign in to the Microsoft Intune admin center and navigate to Groups.
- in the Groups | All Groups page, click on New Group and provide the following details.
- Group type: Security
- Group Name: Windows Autopilot Device Preparation – User Group
- Group description: User group to receive Windows Autopilot device preparation policy.
- Microsoft Entra roles can be assigned to the group: No
- Membership type: Assigned
- Select Create to create the group.
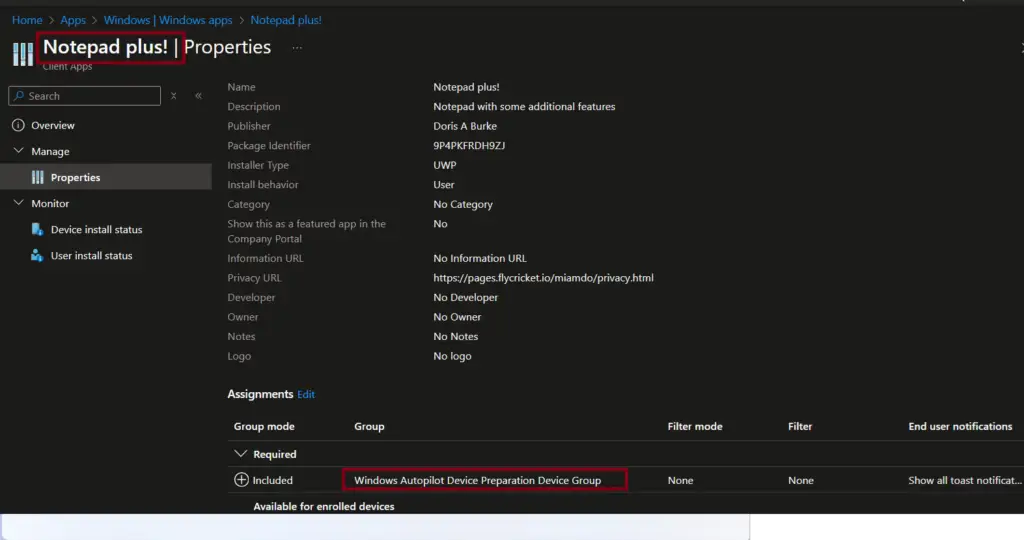
Assign applications and PowerShell scripts to the device group
During device preparation, you can either install applications or run PowerShell scripts as part of the provisioning process.
To ensure they are applied correctly:
Use the required assignment so that these apps/scripts are automatically deployed to every device added to the group during Autopilot Device Preparation.
Assign all required applications and scripts to the device group.
Create a Windows Autopilot device preparation policy
The Windows Autopilot Device Preparation policy defines the settings that will be applied to configure a device during Autopilot provisioning. This ensures a consistent and streamlined deployment experience across your environment.
Steps to Create the Policy
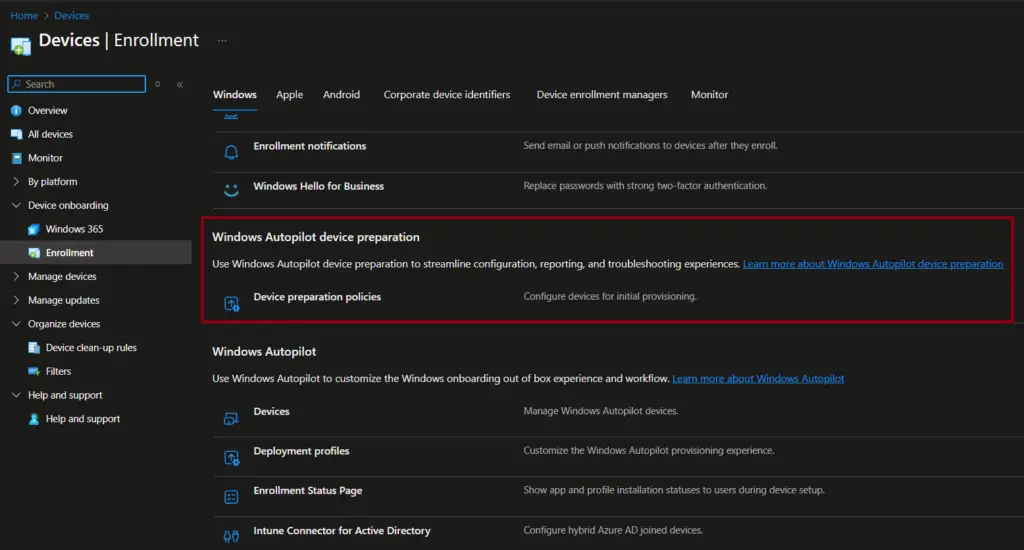
- Sign in to the Intune admin center.
- Navigate to Devices → Device onboarding → Enrollment.
- Under Windows Autopilot Device Preparation, select Device preparation policy.
- Follow the guided steps to configure the policy according to your organizational requirements.
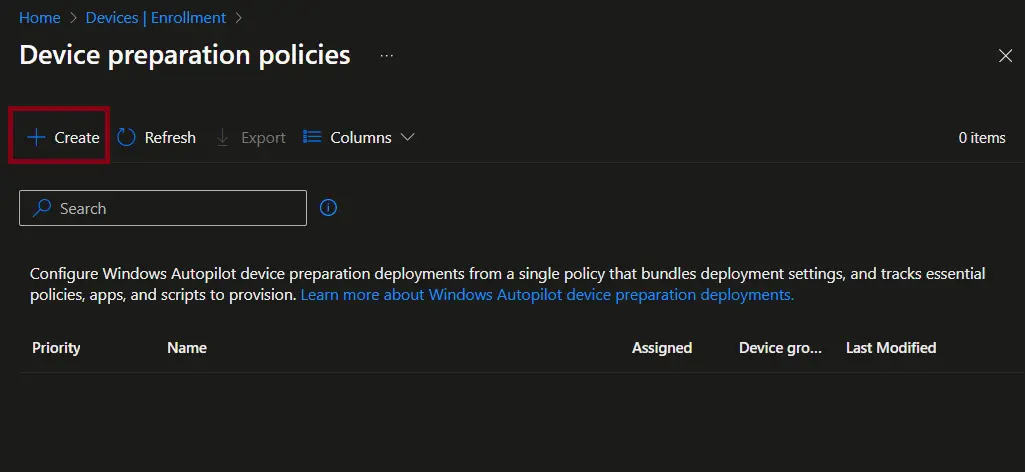
On the Device Preparation Policies page, select + Create to begin configuring a new policy.
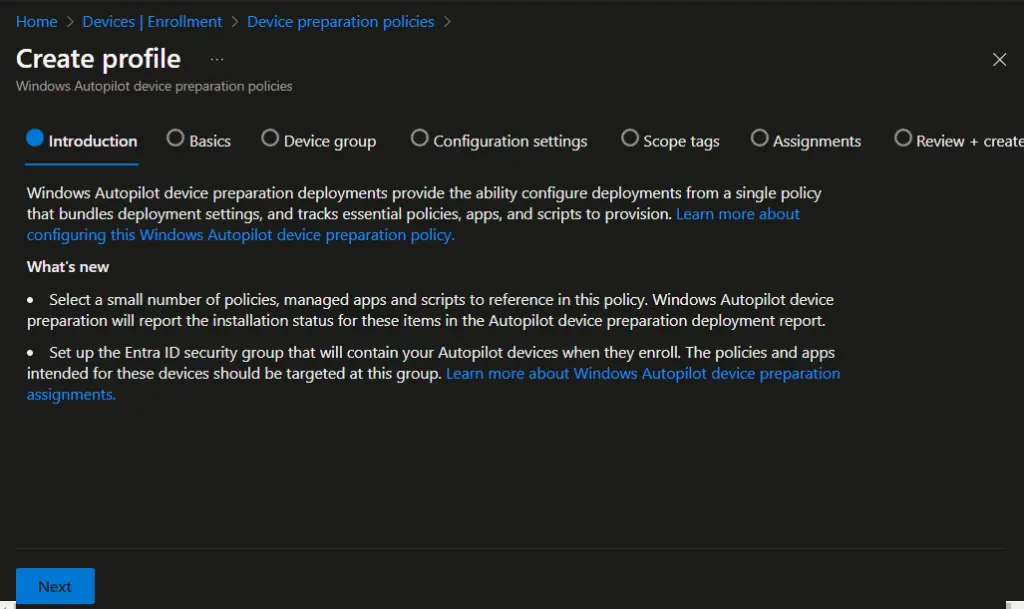
On the Create profile → Introduction page, review the introductory details for the Windows Autopilot Device Preparation policy. Once confirmed, click Next to proceed with the configuration steps.
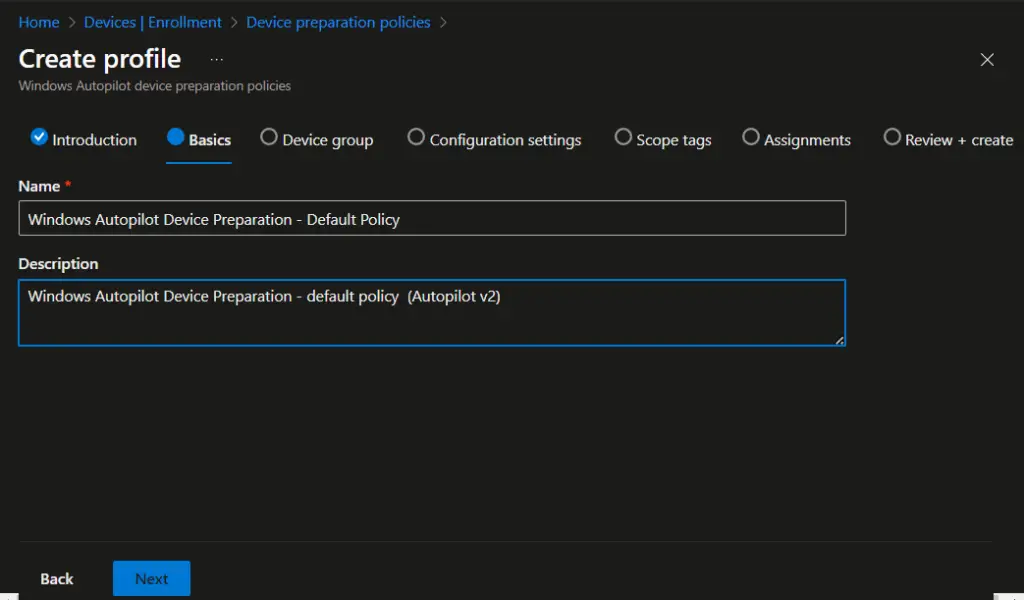
On the Basics page:
- Enter a suitable policy name that reflects its purpose (e.g., Autopilot Device Preparation – HR Laptops).
- Provide a clear description to document the scope or intended use of the policy.
- Once complete, click Next to proceed to the Device group page.
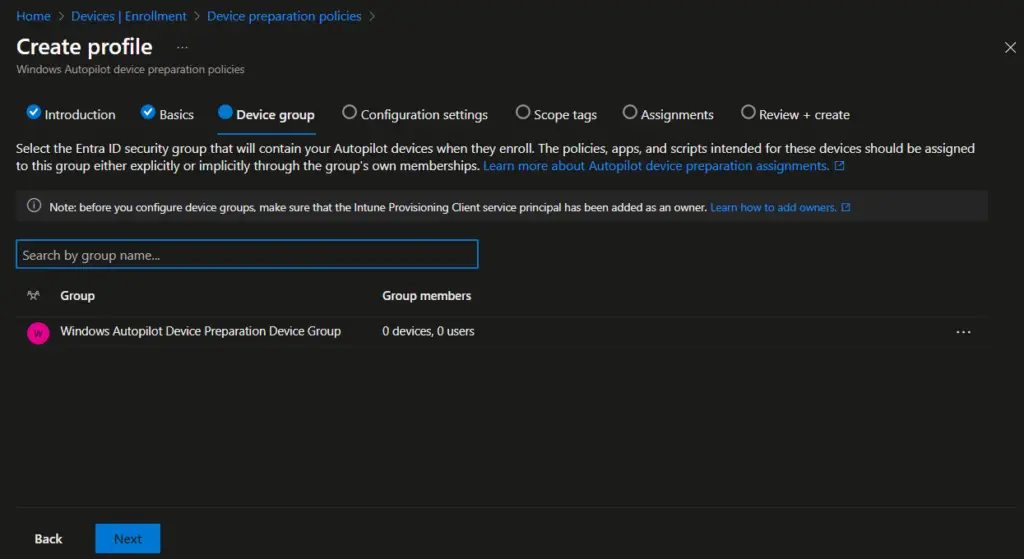
On the Device group page:
- Select the Device preparation – device group that you created earlier.
- Confirm the group assignment to ensure devices are automatically added during deployment.
- Click Next to proceed to the Configuration settings page.
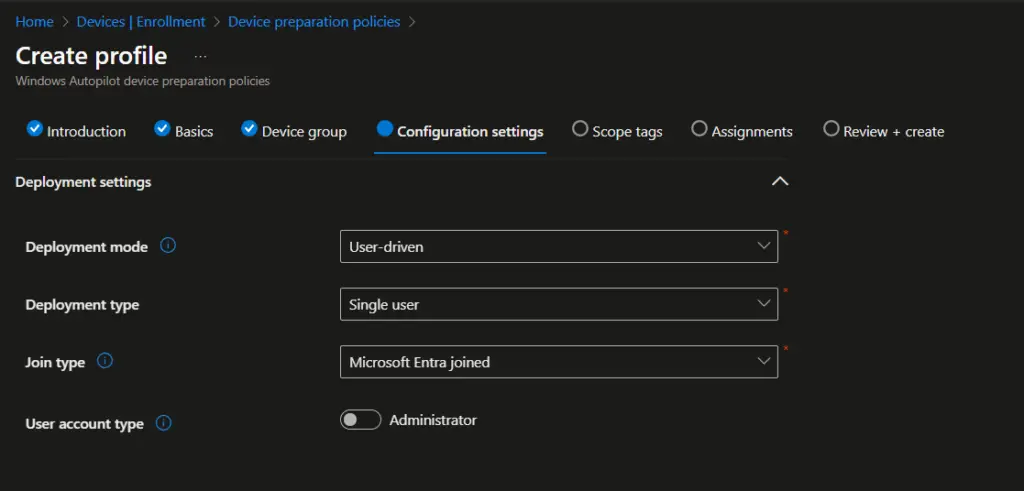
Under Configuration settings → Deployment settings, configure the following options:
- Deployment mode – Choose whether devices are provisioned for user‑driven or pre‑provisioned scenarios.
- Deployment type: Single-user
- Join Type: Microsoft Entra Join
- User account type – Specify if the device should be joined with a standard user account or administrator account.
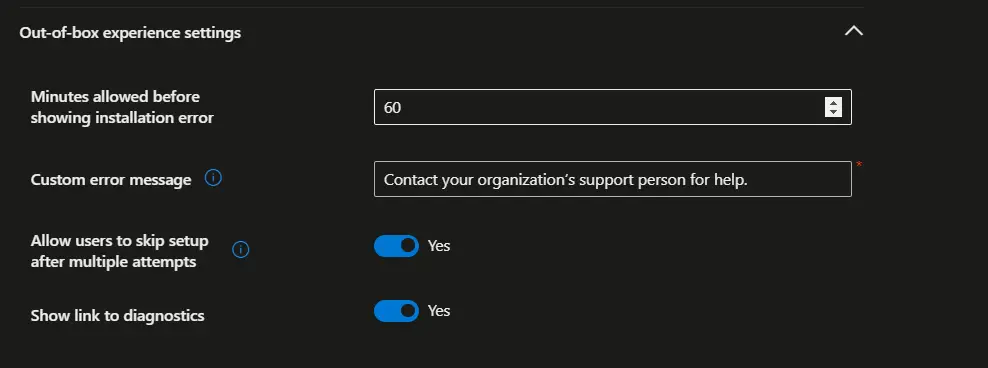
Configure the following settings under Out of Box experience settings.
- Minutes allowed before showing installation error: Default is 60 minutes. You can adjust the value as per your requirements.
- Custom error message: Error message that the user will see when device provisioning failed
- Allow users to skip setup after multiple attempts: Yes/No
- Show link to diagnostics: Yes/No
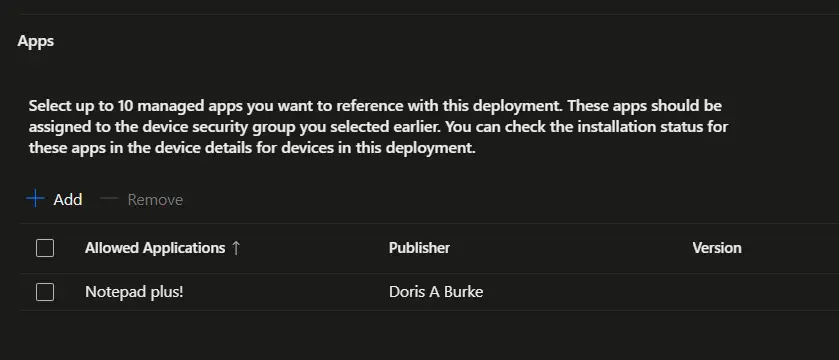
Under Configuration settings → Apps, you can assign up to 10 managed applications to install automatically during device provisioning.
Ensure each app is set with a required assignment so they install consistently on all devices in the group.
Add the required applications that should be deployed during Autopilot Device Preparation.
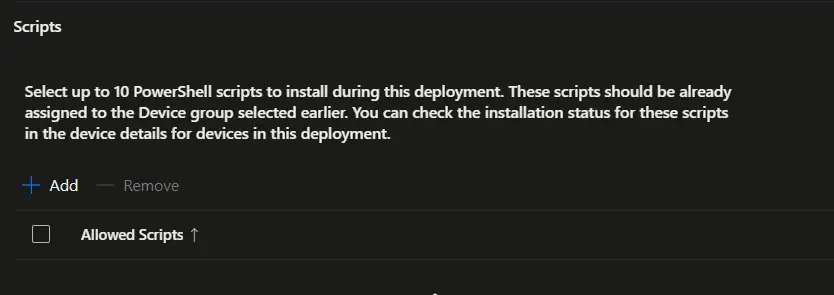
Scroll down to the Scripts section under Configuration settings. Here, you can assign up to 10 PowerShell scripts to run automatically during device deployment.
Steps:
- Navigate to the Scripts section within the policy.
- Add the required PowerShell scripts that should execute during Autopilot Device Preparation.
- Ensure each script is set with a required assignment so it runs consistently on all devices in the group.
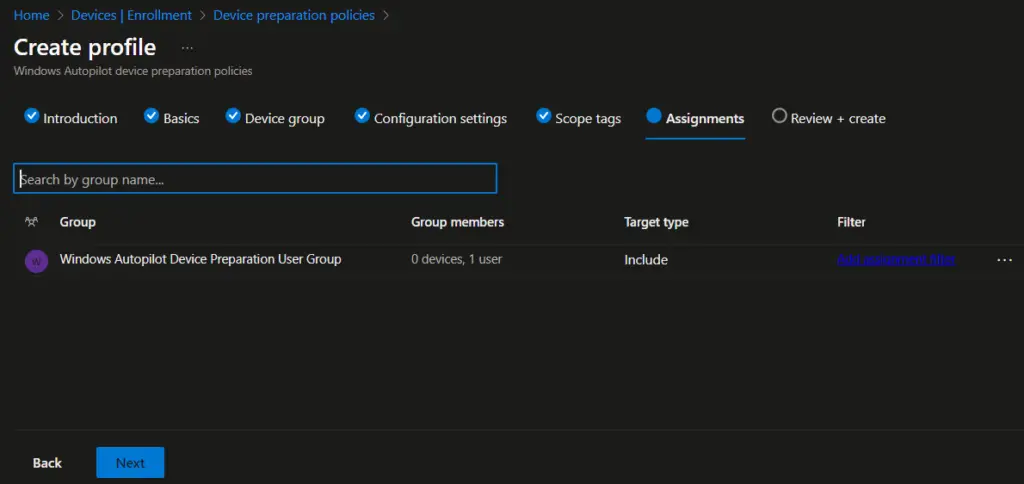
On the Assignment page, assign the policy to the Windows Autopilot Device Preparation user group, ensuring that all users who are members of this group automatically receive the Autopilot Device Preparation policy during deployment, and then click Next to continue with the policy creation process.
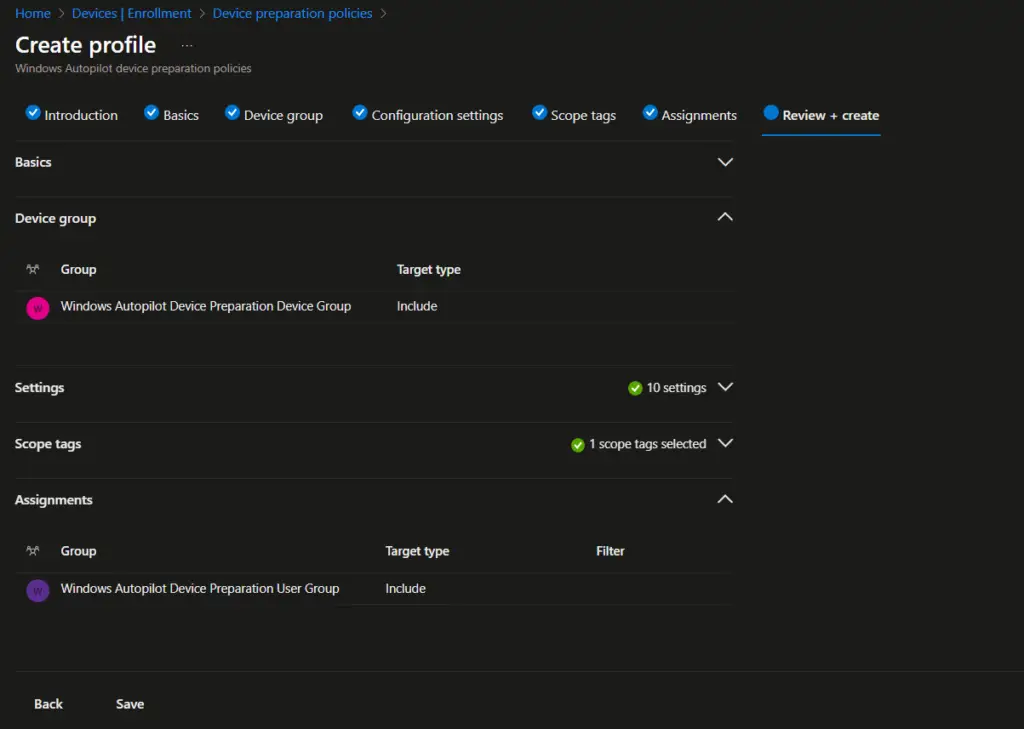
On the Review + create page, carefully review all the configured settings for the Windows Autopilot Device Preparation policy, confirm that the details align with your deployment requirements, and then click Create to finalize and complete the policy creation process.
You can view the details of the Windows Autopilot Device Preparation policy by navigating in the Intune admin center to Devices → Enrollment → Device preparation policies, where all configured policies are listed for review and management.

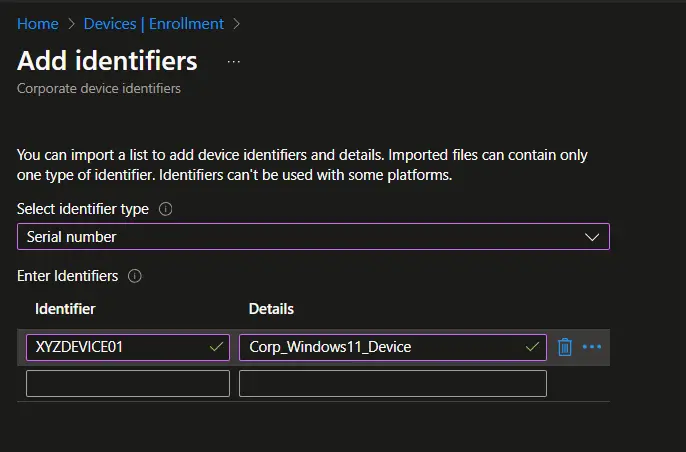
Add a Windows device to the corporate device identifier
Windows Autopilot Device Preparation does not require a device hardware hash. However, to ensure the device is correctly identified as a corporate device, you must provide the device serial number. This allows Intune and Autopilot to recognize and manage the device under your organization’s policies without relying on the hardware hash.
Follow the steps below to add the device serial number as a corporate identifier.
- On the Intune admin console, navigate to Devices > Enrollment > Corporate Identifier and select Add identifiers
- On the Select identifier type, select Serial number
- Under Enter identifiers, enter the Serial number and details, and click on Add.
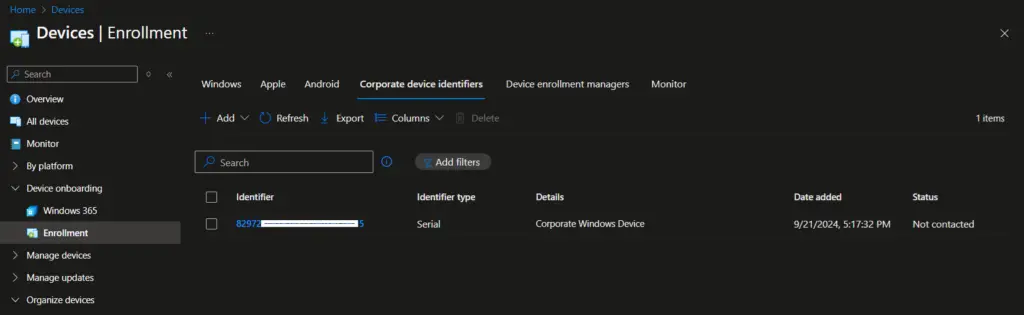
You can now see that the device serial number is listed under the Corporate device identifiers list.
Reset Device to Factory Settings
The device should be reset to the factory settings to enroll in Intune using Autopilot device preparation. Please follow the article below to reset a Windows 11 device to factory settings.
How to Reset Windows 11 PC to Factory Settings
End User Experience
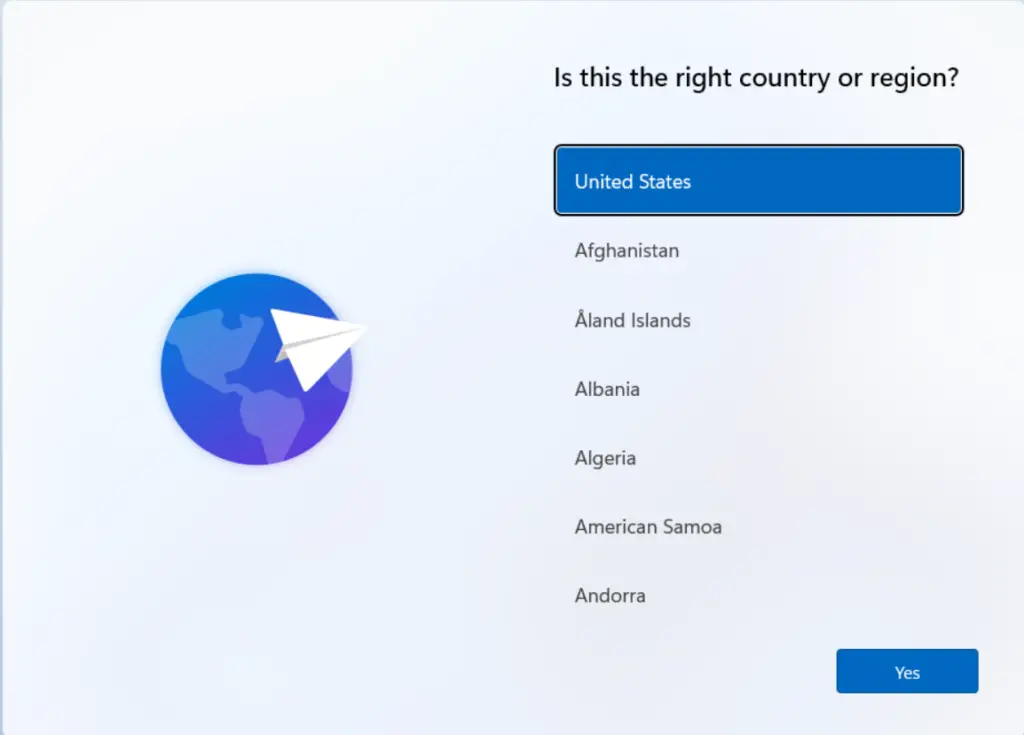
Once a Windows 11 device is reset to factory settings, the first screen the user sees is the country or region selection. At this stage, select the correct country/region from the list and then click Next to continue with the setup process.
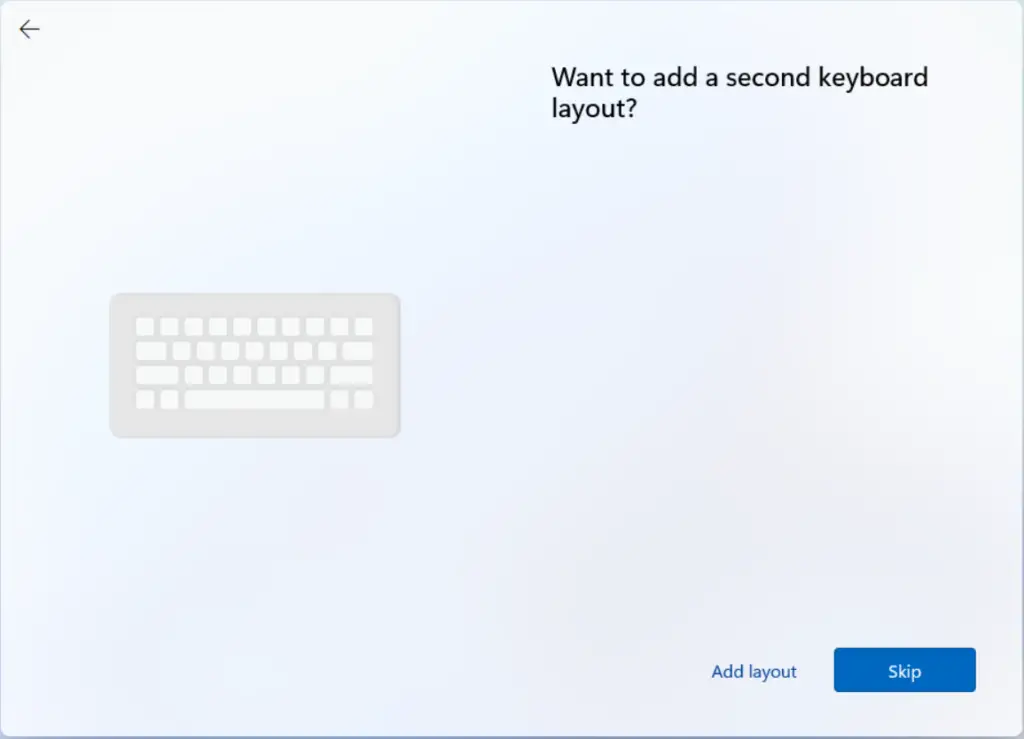
On the Want to add a second keyboard layout? screen, select Add if you want to configure an additional keyboard layout, or choose Next to skip this step and continue to the next screen in the Windows 11 setup process.
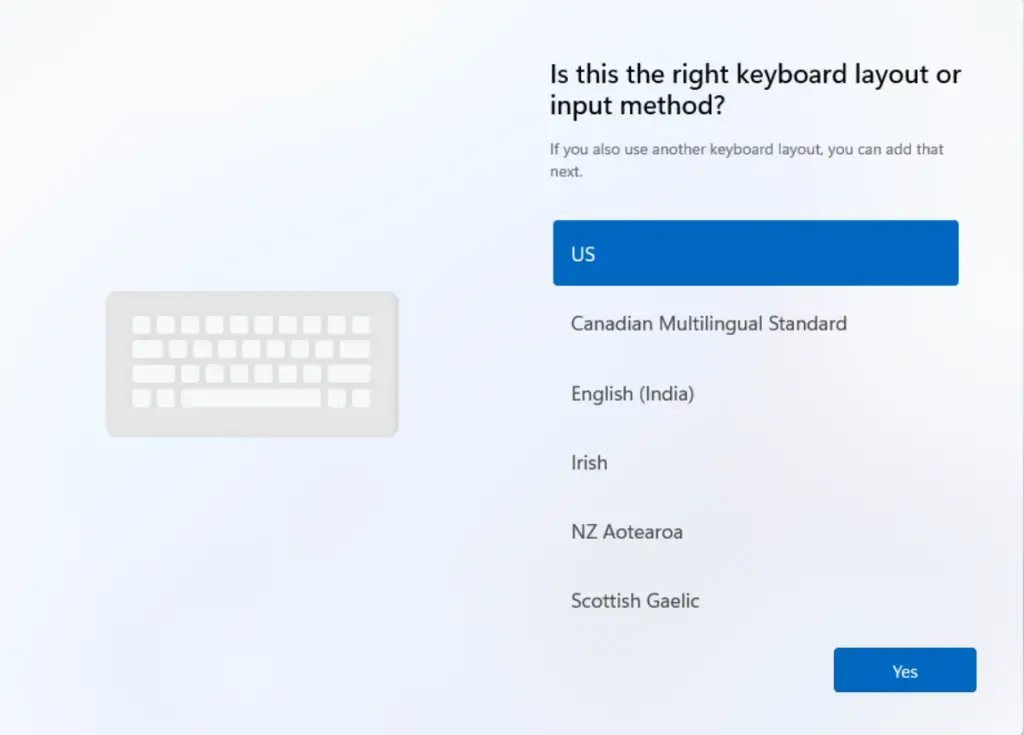
On the Want to add a second keyboard layout? screen, select Add if you want to configure an additional keyboard layout, or choose Next to skip this step and continue to the next screen in the Windows 11 setup process.
On the Checking for updates screen, Windows 11 will automatically search for the latest updates, wait for the process to complete, and once finished, the setup will continue to the next step.

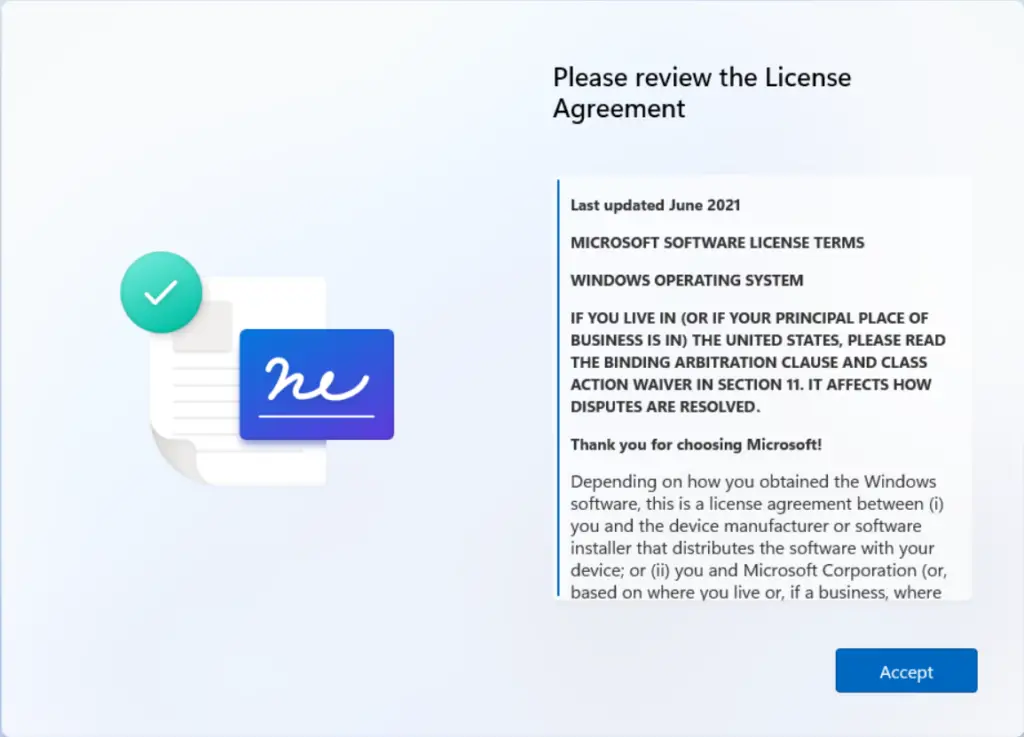
On the Please review the License Agreement screen, carefully read through the license terms, and once you are satisfied, click Accept to proceed with the Windows 11 setup process.
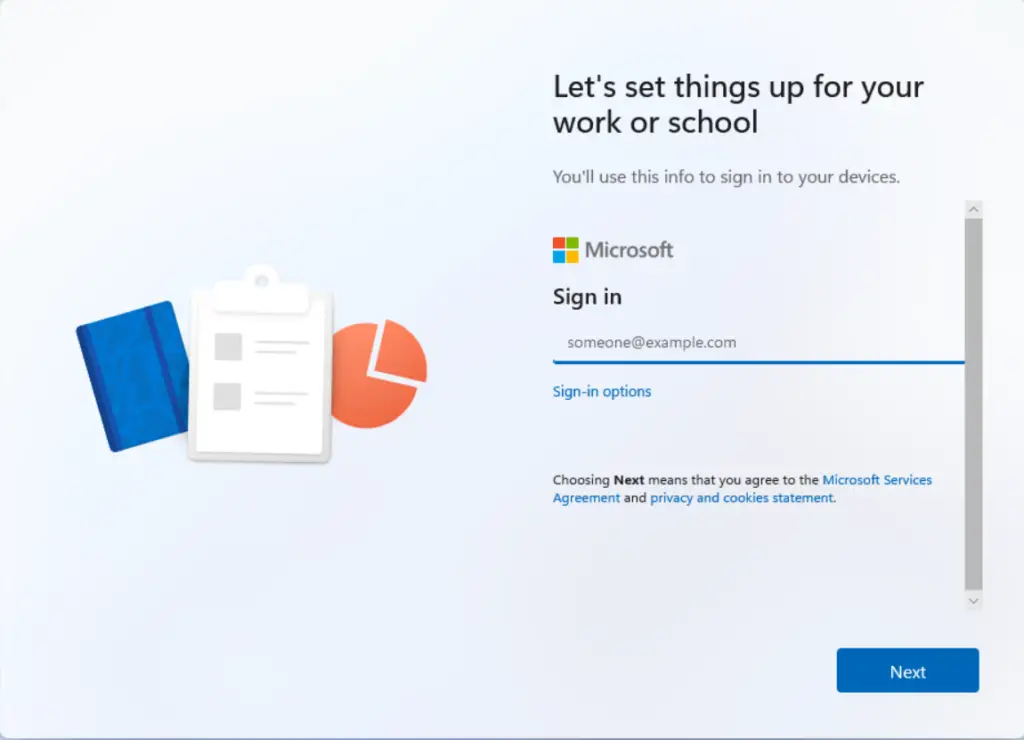
On the Let’s set things up for your Work or school screen, enter your organization account credentials (such as your work or school email address) to connect the device to your organization and continue with the Windows 11 setup process.
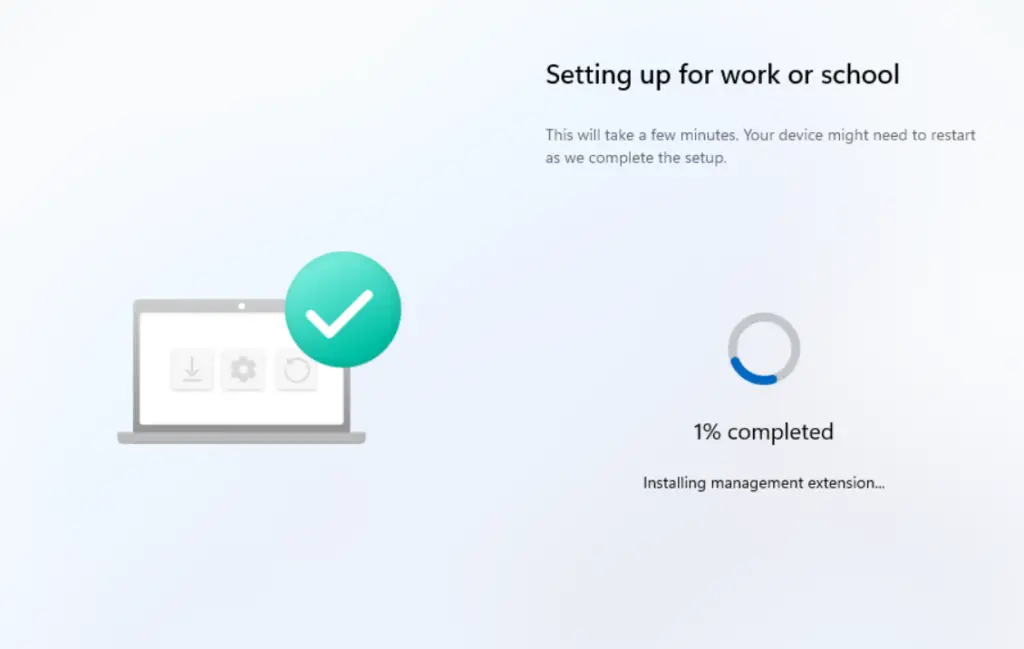
You will now see the Setting up for work or school screen, where Windows 11 begins applying your organization’s configuration. This process may take some time depending on the number of applications, policies, and scripts assigned to the device, so allow the setup to complete before proceeding.
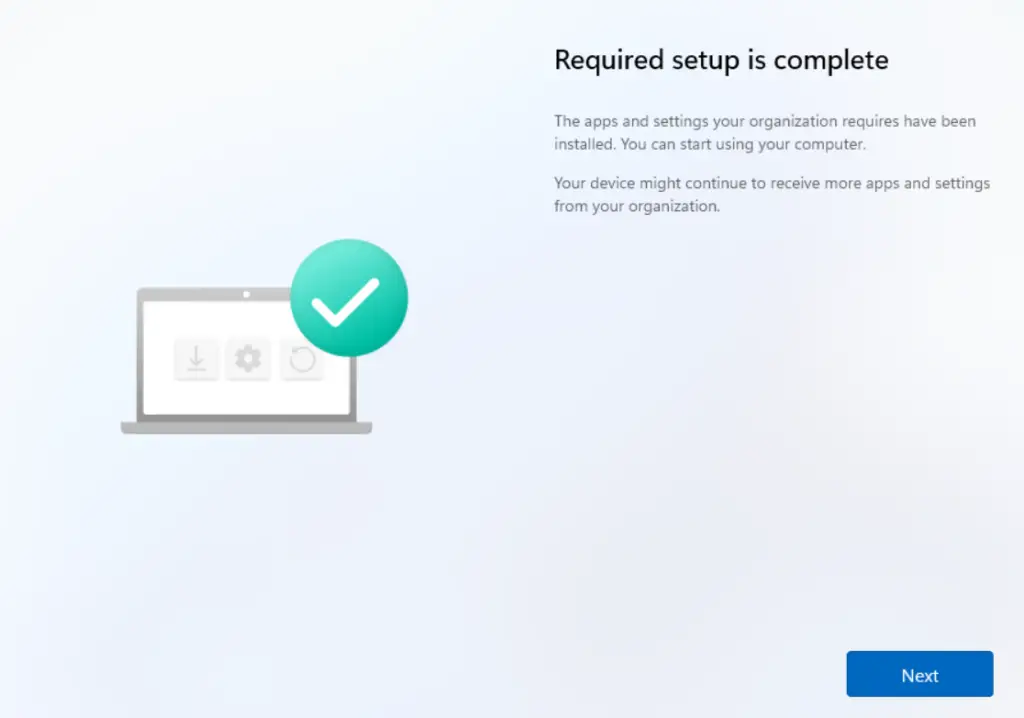
Once the setup is completed, you will see the Required setup is complete screen; click Next to proceed to the following step in the Windows 11 setup process.
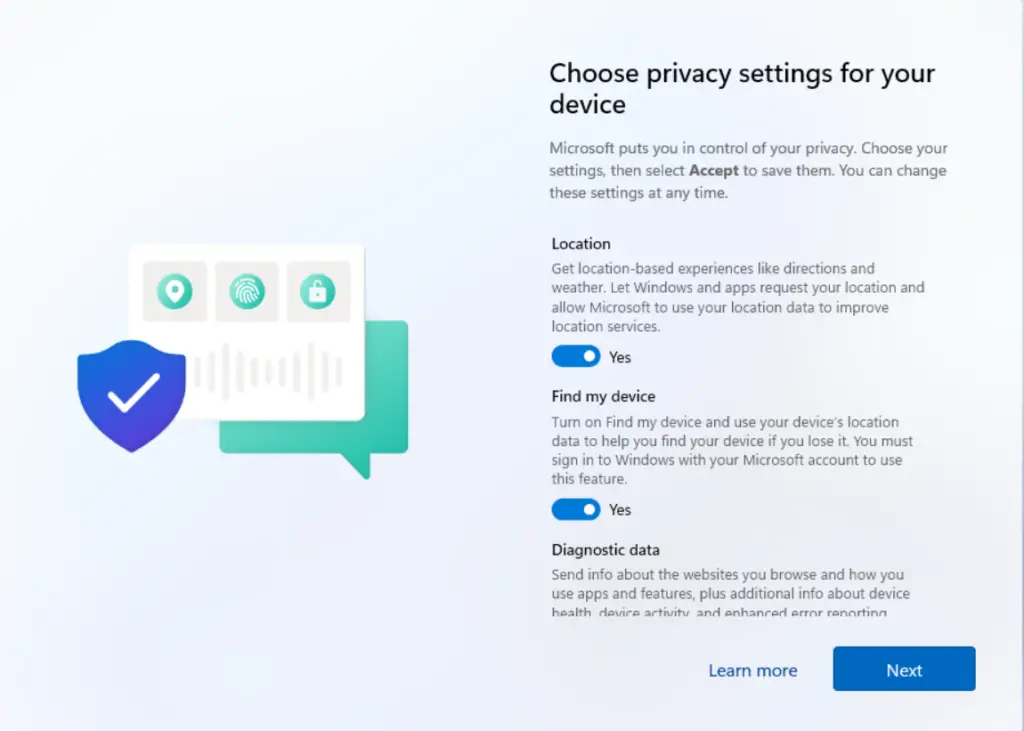
On the Choose privacy settings for your device page, configure the privacy options according to your requirements or organizational policies, and then click Next to continue with the Windows 11 setup process.
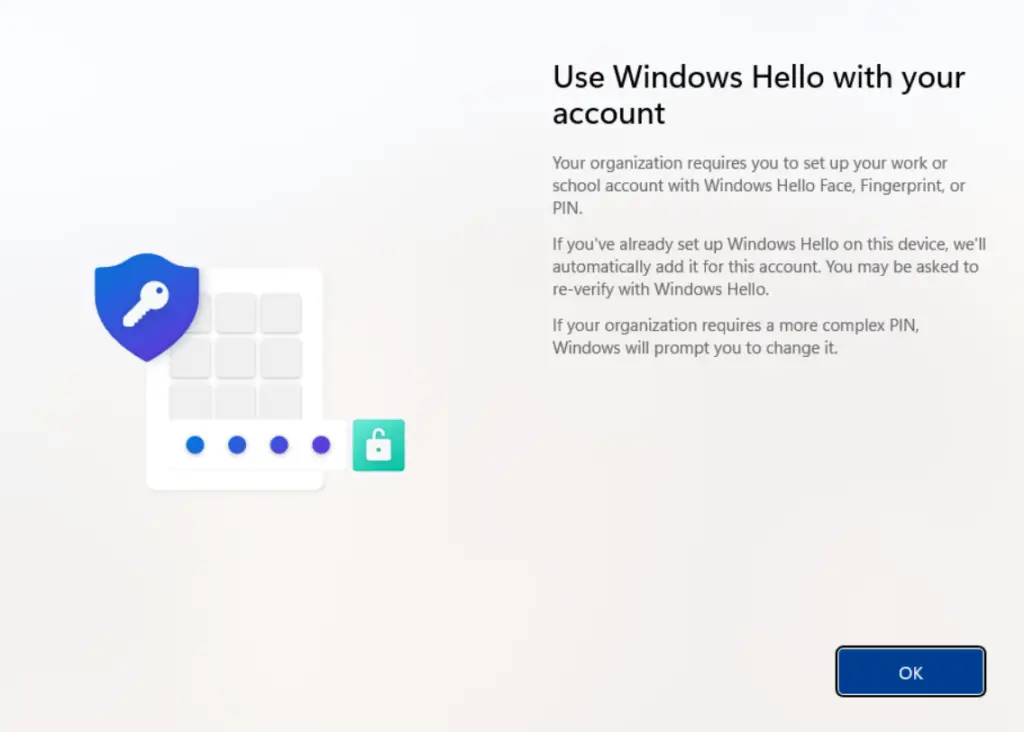
On the Use Windows Hello with your account page, simply click OK to enable Windows Hello and continue with the setup process.
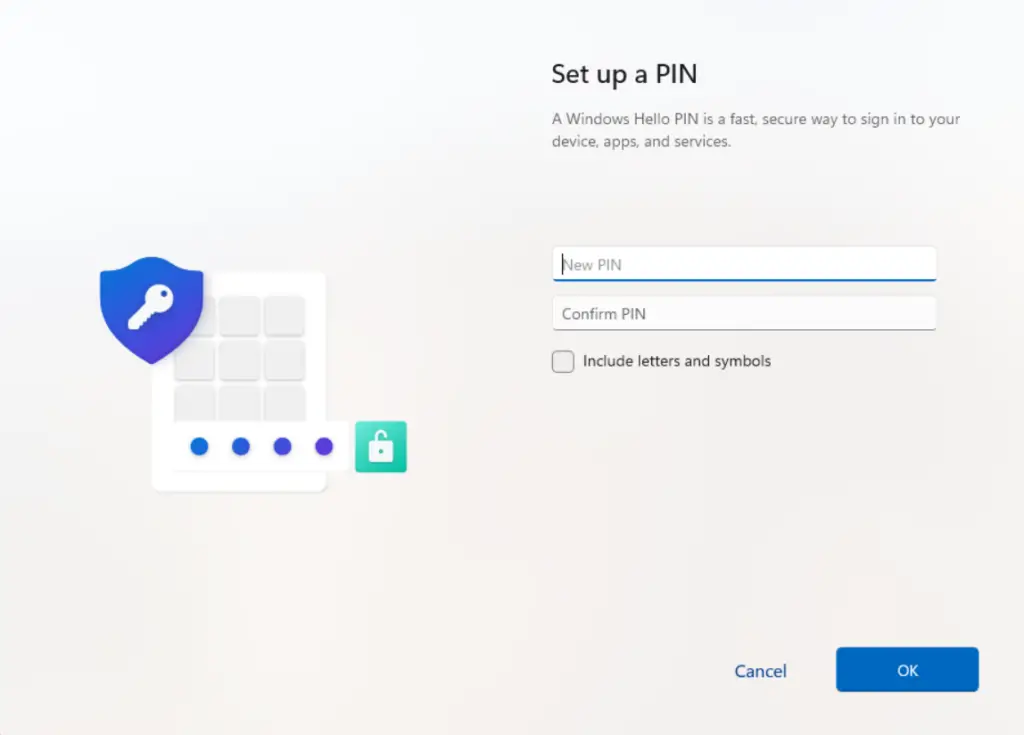
On the Set up a PIN page, enter the PIN you want to use for the device, choosing either a numeric or alphanumeric PIN, and then click OK to continue with the Windows 11 setup process.
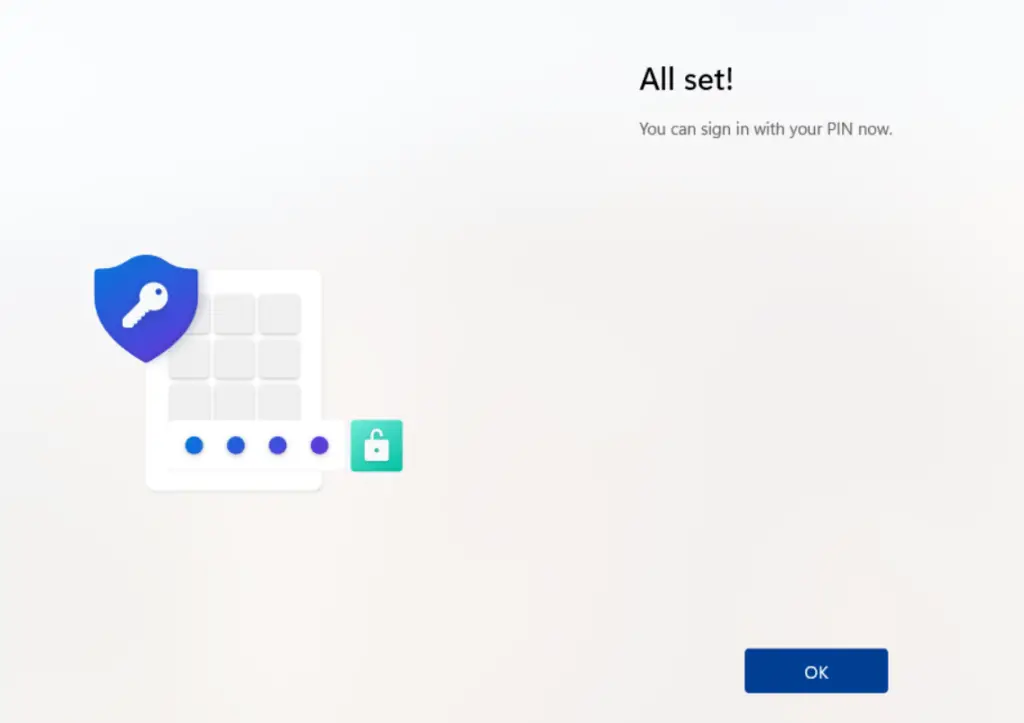
The Windows Autopilot Device Preparation process is now complete. On the final screen, click OK to finish and begin using the device with your organization’s configurations applied.
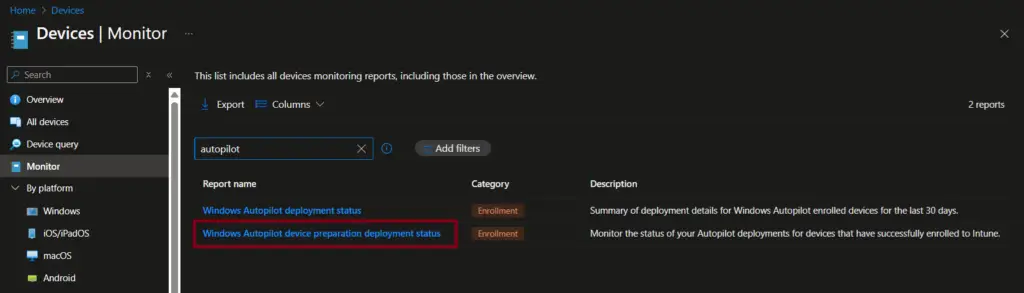
Monitoring & Troubleshooting Autopilot Device Preparation
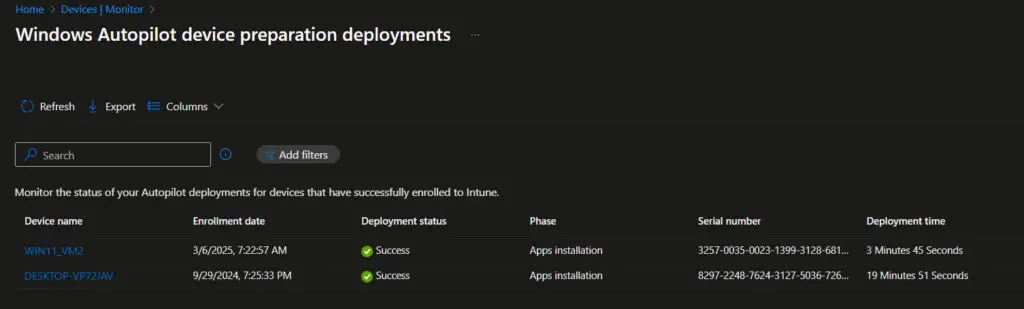
The Windows Autopilot Device Preparation deployments Status report, found under Devices → Monitor, provides a real-time view of device provisioning using the Device Preparation policy.
- The deployment status clearly indicates whether a device is In progress, Success, or failed.
- The report also breaks down the policy installation, app installation, and script execution status, giving admins visibility into which components have been applied successfully and where issues may exist.
This makes it a central place for IT admins to track Autopilot provisioning health and troubleshoot failures quickly. Would you like me to draft a stepwise troubleshooting checklist for interpreting and resolving common failures shown in this report?
Once you select the Windows Autopilot device preparation deployments status report, you’ll see a list of all devices that have been provisioned or are currently in progress. From this view, you can click on a specific device name to drill down into detailed information about that device—such as the progress of policy application, app installations, and script execution—helping you quickly identify where provisioning is succeeding or where issues may need troubleshooting.
The Device deployment details flyer window shows the device information, the status of the app’s installation, and the status of the script execution.
Select the device name to view:
- Policy installation status → Confirms if configuration profiles were applied.
- App installation status → Shows which apps were installed successfully or failed.
- Script execution status → Indicates whether assigned scripts ran correctly.

Classic Autopilot vs. Autopilot Device Preparation (v2)
The table below highlights the key differences between Classic Autopilot and Autopilot Device Preparation (v2), helping IT admins quickly understand how the new approach streamlines deployment compared to
| Feature | Classic Autopilot | Autopilot v2 Device Preparation |
|---|---|---|
| Device Identification | Hardware hash import required | Serial number only |
| Registration | Must register with Autopilot service | No registration needed |
| Setup Speed | Slower, manual steps | Faster, automated |
| Use Cases | Standard provisioning | Tenant migration, re‑provisioning |
Conclusion
Windows Autopilot Device Preparation (Autopilot v2) represents a major step forward in simplifying modern device deployment. By eliminating the need for hardware hash imports and leveraging serial numbers for identification, it streamlines provisioning, reduces administrative overhead, and accelerates onboarding. Whether you’re re‑provisioning devices for new users, migrating between tenants, or standardizing enterprise setups, Autopilot v2 ensures a faster, cleaner, and more secure deployment experience. Following this step‑by‑step guide, IT admins can confidently adopt Autopilot Device Preparation to future‑proof their Windows 11 deployment strategy.
Frequently Asked Questions (FAQs)
What is Windows Autopilot Device Preparation (Autopilot v2)?
Windows Autopilot Device Preparation, also known as Autopilot v2, is Microsoft’s streamlined provisioning method for Windows 11 devices. Unlike classic Autopilot, it uses the device serial number instead of hardware hashes, simplifying deployment and reducing administrative overhead.
How is Autopilot v2 different from classic Windows Autopilot?
Classic Autopilot: Requires hardware hash import and device registration.
Autopilot v2 (Device Preparation): Uses serial numbers, no hardware hash required, faster setup.
This makes Autopilot v2 ideal for tenant migrations, re‑provisioning, and bulk deployments.
What are the requirements for using Windows Autopilot Device Preparation?
- Operating System: Windows 11 version 22H2 or 23H2 with update KB5035942 or later.
- Identity: Only Microsoft Entra ID join (Azure AD join) is supported.
- Device Registration: Device must not already be registered with classic Autopilot.
- Licensing: Users must have Intune and Entra ID Premium licenses assigned.
How do I configure automatic Intune enrollment for Autopilot v2?
Enable automatic MDM enrollment in Microsoft Entra ID:
- Go to Azure portal > Entra ID > Mobility (MDM and MAM) > Microsoft Intune.
- Configure MDM user scope to include the required Azure AD group.
- This ensures devices joining Entra ID are automatically enrolled in Intune.
Can I assign apps and PowerShell scripts during Autopilot Device Preparation?
Yes. You can assign up to 10 managed applications and 10 PowerShell scripts to run automatically during provisioning. These must be set as required assignments to ensure consistent deployment across all devices.
How do I add a device to the corporate device identifier list?
Instead of hardware hashes, Autopilot v2 requires the device serial number:
- Navigate to Intune Admin Center > Devices > Enrollment > Corporate Identifier.
- Select the serial number and add the device details. This ensures the device is recognized as corporate‑owned.
What happens if a device is already registered with classic Autopilot?
If a device is registered with classic Autopilot, its existing Autopilot profile takes precedence. You must deregister the device before applying an Autopilot Device Preparation policy.
How can IT admins monitor and troubleshoot Autopilot Device Preparation deployments?
Use the Deployment Status Report in Intune:
- Navigate to Devices > Monitor > Autopilot Device Preparation deployments.
- View provisioning status (In progress, Success, Failed).
- Drill down into policy installation, app installation, and script execution to identify issues.
Is Autopilot Device Preparation supported for Windows 10 devices?
No. Autopilot v2 is designed for Windows 11 devices only. Windows 10 devices must use the classic Autopilot process with hardware hash registration.
Related Posts
- How to Fix Autopilot error 80070002
- Windows Autopilot Device Preparation – Step-by-Step Guide
- Windows 10 Autopilot Deployment Guide | Intune
- Intune – Configure Enrollment Status Page (ESP)
- Intune – Windows 10 MDM- Basic troubleshooting
- Bulk enrollment of Windows 10/ 11 Device to Intune using Provisioning Package
- Enroll Windows 11 Device to Intune through Azure AD Join method
- Windows 11 enrollment with Provisioning package failed with error code 0x800700b7
- How to Obtain Hardware Hash for Manually Registering Devices with Windows Autopilot
- Dynamic Group Based on Enrollment Profile in Intune.
Subscribe to Techuisitive Newsletter
Be the first to know about our new blog posts. Get our newsletters directly in your inbox and stay up to date about Modern Desktop Management technologies & news.