The Enrollment Status Page (ESP) in Microsoft Intune provides users with real-time visibility into device setup during Windows Autopilot or Entra ID join. By configuring ESP, IT admins can control whether devices are blocked until apps, policies, and profiles are installed, ensuring a smoother onboarding experience and reducing support calls. This guide walks you through creating and customizing ESP profiles step by step
Enrollment Status Page Profiles and Priority in Intune
You can assign multiple Enrollment Status Page (ESP) profiles in Intune to a single device. When this occurs, the ESP profile with the highest priority will take precedence. During the device setup phase, the Enrollment Status Page monitors key configuration items, including:
- Security policies
- Certificate profiles
- Network connectivity
- Applications
For more detailed guidance, refer to the official Microsoft documentation
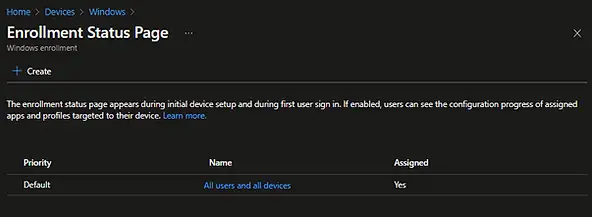
You can deploy multiple Enrollment status page Intune profiles to a device. However, the ESP with the highest priority will take precedence.
The enrollment status page tracks these items during the device setup phase:
Create a new Enrollment Status Page ( ESP ) profile
Create Enrollment Status Page
Follow these steps to configure an Enrollment Status Page profile in Intune:
- In the Microsoft Intune admin center (formerly Endpoint Manager), navigate to:
Devices > Windows > Windows enrollment - Select Enrollment Status Page.
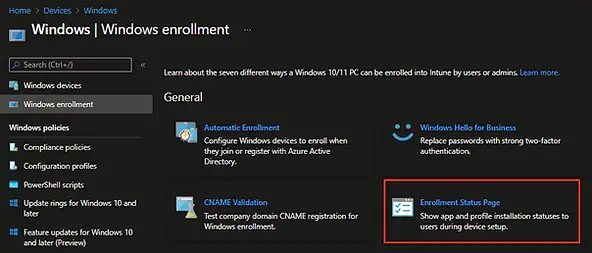
- On the Enrollment Status Page screen, Click + Create to begin setting up a new ESP profile
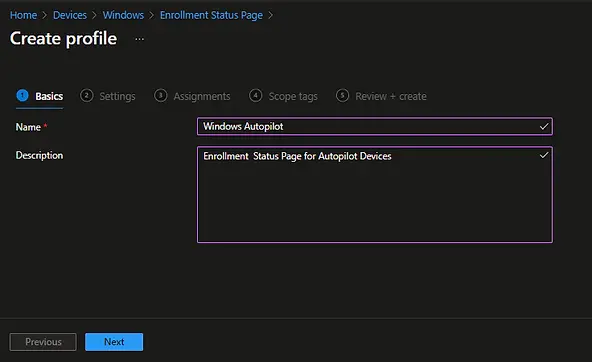
On the Create Profile – Basics page:
- Enter the required basic information:
- Name: Provide a descriptive name for the ESP profile.
- Description: Add a meaningful description to explain the purpose of the profile.
- Click Next to continue with the configuration
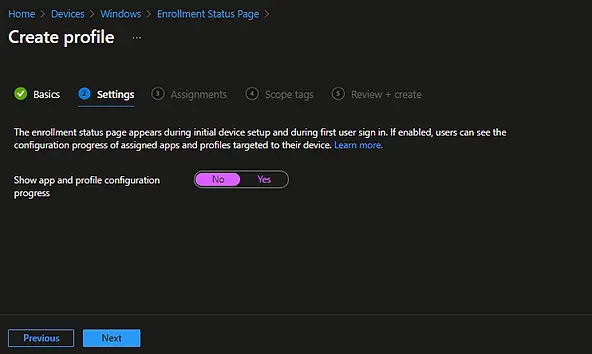
On the Create profile – Settings page, configure the following settings:
- Show app and profile configuration progress:
- No: Select this option if you don’t want to show the Enrollment Status Page to users during device setup.
- Yes: Select this option if you want to show the Enrollment Status Page to users during device setup.
Configure ESP Settings in Intune
Once you select Yes in the previous screen, all available Enrollment Status Page (ESP) settings will be displayed. These settings allow you to configure how devices behave during the enrollment process, including blocking access until required apps, policies, and profiles are installed

Available Settings in the Enrollment Status Page (ESP)
When configuring the ESP profile in Intune, the following settings are available:
- Show an error when installation takes longer than the specified number of minutes
- Default timeout: 60 minutes
- Increase if apps require more time during enrollment.
- Show a custom message when the time limit or an error occurs
- Add a custom message for users.
- Include contact details for support during Autopilot deployment.
- Turn on the log collection and diagnostics page for end users
- Helps with troubleshooting enrollment issues.
- Only show the page to devices provisioned by Out-of-Box Experience (OOBE)
- No: Show ESP to all Intune-managed/co-managed devices during OOBE and first sign-in.
- Yes: Show ESP only to devices provisioned via OOBE.
- Block device use until all apps and profiles are installed
- No: Users can leave ESP before configuration finishes.
- Yes: Users must wait until the configuration completes.
- Allow users to reset the device if an installation error occurs
- Yes: Users can reset the device when installation fails.
- Allow users to use the device if an installation error occurs
- Yes: Users can bypass ESP and use the device.
- No: Users must wait until installation succeeds.
- Block device use until required apps are installed
- Restricts device usage until mandatory apps are installed.
- Option to enforce all apps or selected apps only.
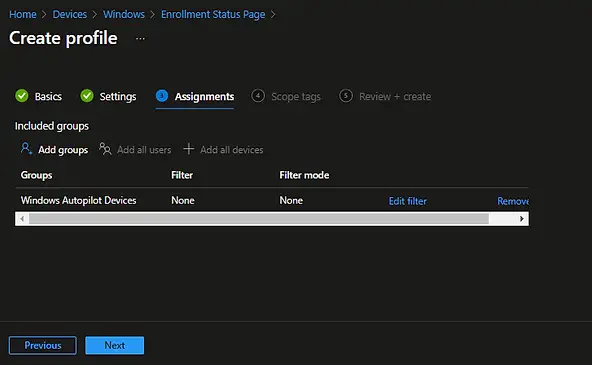
Assign ESP Profile to Device Groups
On the Assignments page:
Click Add groups.
Select the group where you want to deploy the Autopilot Enrollment Status Page (ESP) profile.
Review the selected group name to confirm accuracy.
Click Next to proceed.
Leave default settings in the Scope tags page and click on Next.
Review and Create the ESP Profile
On the Review + Create page:
Carefully review all the ESP profile settings you configured in the previous steps.
Confirm that the profile name, description, assignments, and configuration options are correct.
Click Create to finalize and deploy the Enrollment Status Page (ESP) profile
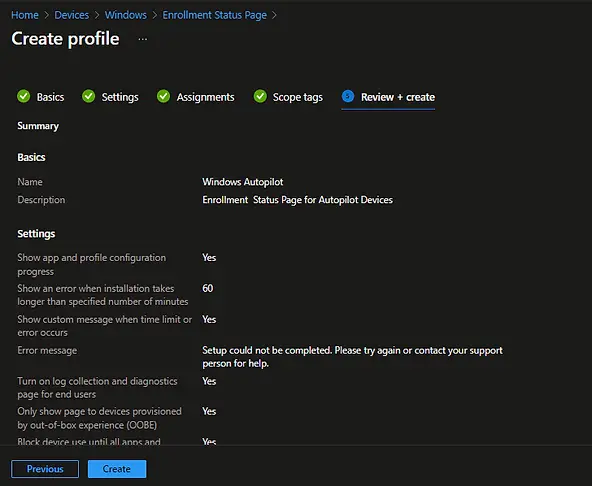
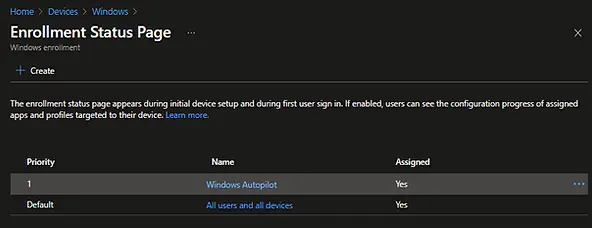
The Enrollment Status Page (ESP) profile is now created and will appear in the ESP profile list within Intune.
If multiple ESP profiles are assigned to a device, the profile with the highest priority will take precedence during enrollment. This ensures that the most critical configuration is applied consistently.
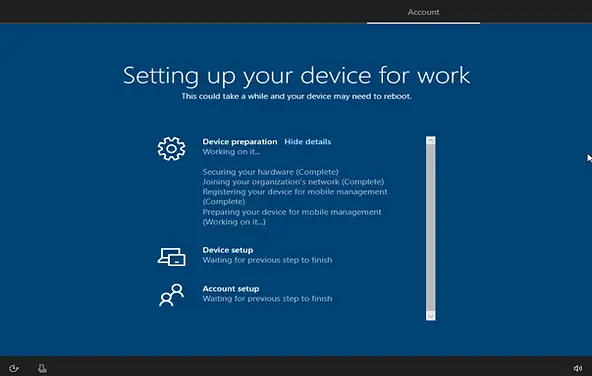
ESP Profile Visibility During Autopilot Provisioning
The next time you provision a device using Windows Autopilot, the configured Enrollment Status Page (ESP) profile will automatically appear after the Out-of-Box Experience (OOBE). This ensures that users see the enrollment progress and that required apps, policies, and profiles are installed before the device becomes available for use.
Frequently Asked Questions (FAQs)
What is the Enrollment Status Page (ESP) in Intune?
The ESP provides users with real‑time visibility into the device setup process during Windows Autopilot or Microsoft Entra ID join. It ensures that required apps, policies, and profiles are installed before the device becomes available.
Can I assign multiple ESP profiles to a device?
You can deploy multiple ESP profiles to a device, but the profile with the highest priority will take precedence.
When does the ESP appear during Autopilot provisioning?
The ESP is displayed immediately after the Out‑of‑Box Experience (OOBE) when a device is provisioned using Windows Autopilot.
What happens if installation takes longer than expected?
By default, ESP shows an error if installation exceeds 60 minutes. You can increase this timeout if apps or policies require more time.
Can users bypass the ESP if an installation fails?
Yes, depending on your configuration. You can allow users to either:
- Reset the device if installation fails, or
- Bypass ESP and use the device even if errors occur.
How can I troubleshoot ESP issues?
Enable log collection and diagnostics in the ESP settings. This provides detailed logs that help identify and resolve enrollment problems.
Does ESP apply only to Autopilot devices?
Not necessarily. You can configure ESP to show for all Intune‑managed and co‑managed devices during OOBE, or restrict it to Autopilot devices only.
Can I block device use until required apps are installed?
Yes. ESP allows you to block device usage until all mandatory apps (or selected apps) are installed, ensuring compliance before users access the device.
Related Posts:
- How to Fix Autopilot error 80070002
- Windows Autopilot Device Preparation – Step-by-Step Guide
- Windows 10 Autopilot Deployment Guide | Intune
- Intune – Configure Enrollment Status Page (ESP)
- Intune – Windows 10 MDM- Basic troubleshooting
- Bulk enrollment of Windows 10/ 11 Device to Intune using Provisioning Package
- Enroll Windows 11 Device to Intune through Azure AD Join method
- Windows 11 enrollment with Provisioning package failed with error code 0x800700b7
- How to Obtain Hardware Hash for Manually Registering Devices with Windows Autopilot
- Dynamic Group Based on Enrollment Profile in Intune.
Subscribe to Techuisitive Newsletter
Be the first to know about our new blog posts. Get our newsletters directly in your inbox and stay up to date about Modern Desktop Management technologies & news.