Managing browser settings across an enterprise can be challenging, especially when relying on custom OMA-URI configurations. With the release of Intune Administrative Templates for Google Chrome, IT admins can now configure policies quickly and consistently without complex scripting. In this guide, we’ll walk through how to use Intune Endpoint Manager to apply Chrome settings such as homepage, startup pages, password manager, and theme color—ensuring a secure and standardized browsing experience for your organization.
Create a Google Chrome Device configuration profile
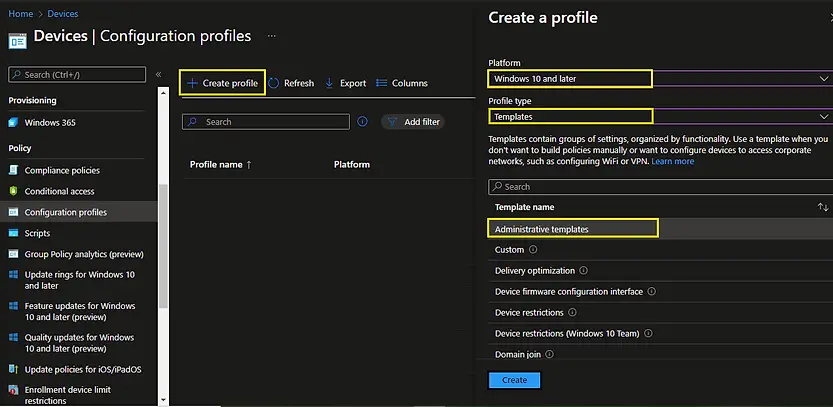
- To create a Device configuration profile, log in to the Microsoft Intune Admin Center, navigate to Devices > Windows > Configuration profiles, and click Create profile.
- Select the following options:
- Platform: Windows 10 and later
- Profile type: Templates
- Template name: Administrative template
- Click on Create
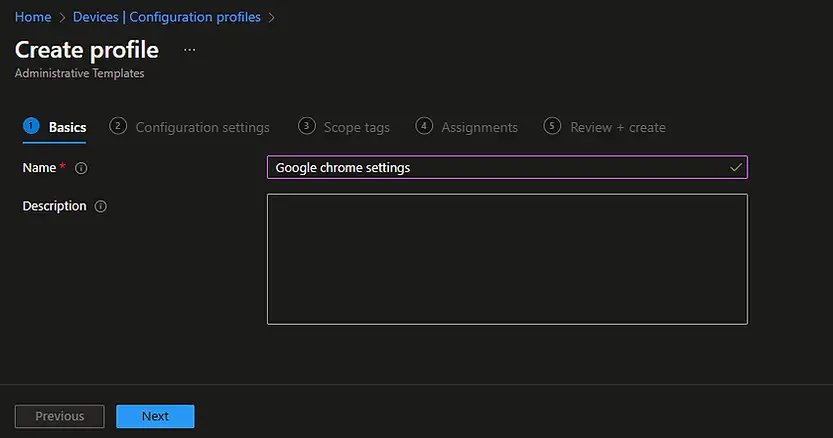
- On the Basics page of the Intune Device Configuration Profile wizard, provide a clear and descriptive name for the profile (for example, Google Chrome Settings – Administrative Templates). Adding a meaningful description is recommended to help other administrators understand the purpose of the profile, especially when managing multiple configurations. Once the profile name and description are set, click Next to proceed to the Configuration settings page, where you can define specific Chrome policies.
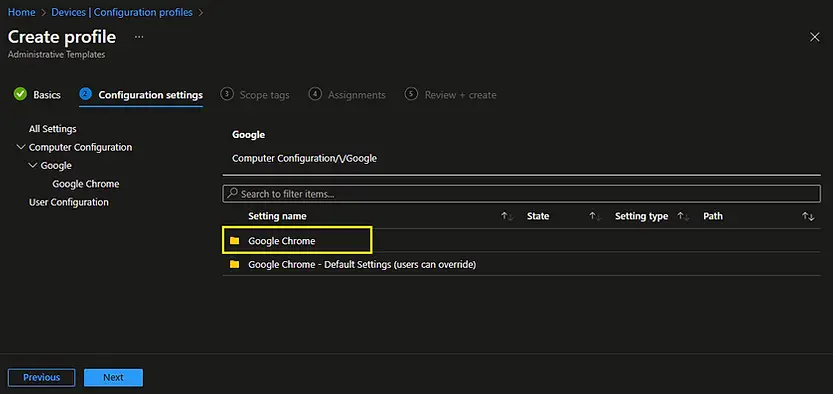
- On the Configuration settings page of the Intune Administrative Templates profile, you will see three options:
- All Settings
- Computer Configurations
- User Configurations
- Select Computer Configuration to apply policies at the device level. From the Settings name list, navigate to Google > Google Chrome. This section contains all available Chrome policies that can be managed through Intune, such as homepage configuration, startup pages, password manager settings, and security restrictions. Choosing Computer Configuration ensures that the applied Chrome policies are enforced consistently across all devices, regardless of which user logs in.
Note: There are other options, “Google Chrome – Default settings (user can override). You can use this template if you want to configure settings as the default one and allowing user to change if they wish to do so.
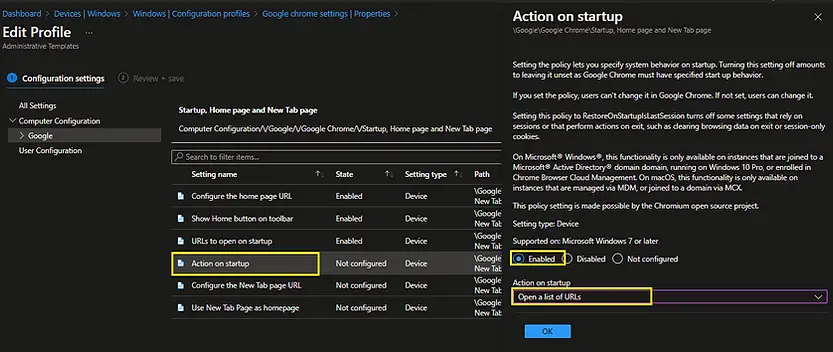
- Scroll down to Settings and select Startup, Home page, and New Tab page

You can see the available settings in this group in the next screen.
Configure the Google Chrome Startup page
We will configure the Google Chrome startup page first. The page that automatically loads whenever you launch Google Chrome is the startup page. You can add multiple startup pages, and they all become available when you launch Chrome.
We need to configure two settings for the Chrome startup page.
Select Action on startup setting and select Enabled from the flyer display. Select Open a list of URL’s in the Action on startup list box and click on Ok to return to the previous window.
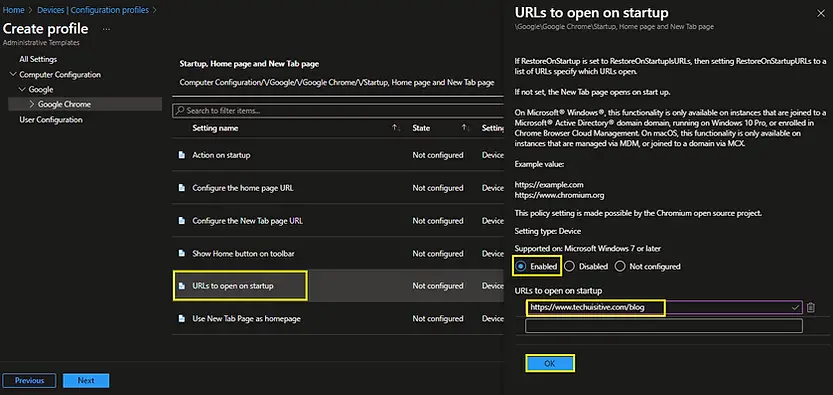
From the list of settings, select URLs to open on startup settings and select Enabled from the flyer display. Provide the list of URL’s which you want to open at startup in the URLs to open on startup text boxes.
Click on Ok to return to the previous screen.
Configure Google Chrome Homepage
We will now configure the Google Chrome homepage. We will configure 3 settings for this.
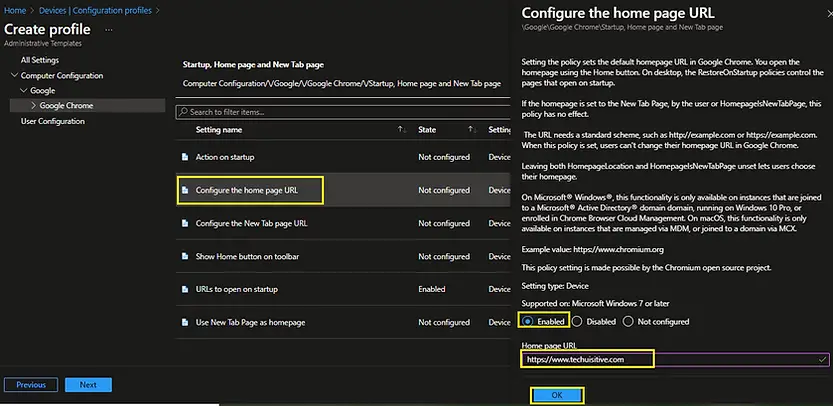
Select Configure the home page URL settings, and click on Enabled from the flyer display. Provide the home page URL under the Home page URL text box.
Click on Ok to return to the previous screen.
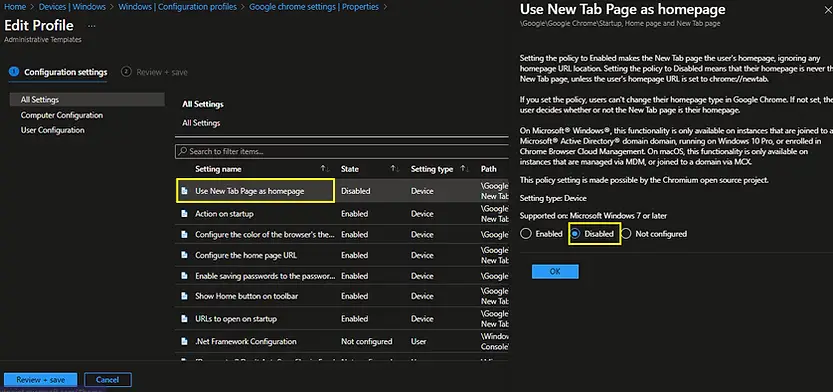
Select Use New Tab Page as Homepage and click on Disabled. Please note that the home page setting will not be effective if this setting is enabled. Click on Ok.
Select the Show Home button on the toolbar settings and click on Enabled at flyer display. This option will allow us to navigate to the home page by clicking on the home button on tool bar. Click on Ok to return to the previous screen.

Enable saving passwords to the password manager
We will now configure the settings to enable saving the password to the password manager. This is one of the random settings we picked up for this demonstration.
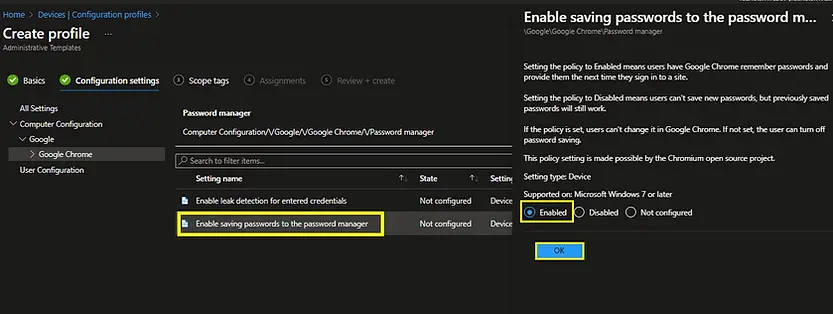
To enable saving passwords to the password manager, select the Enable saving passwords to the password manager setting and click on Enabled.
Click on Ok to return to the previous screen.
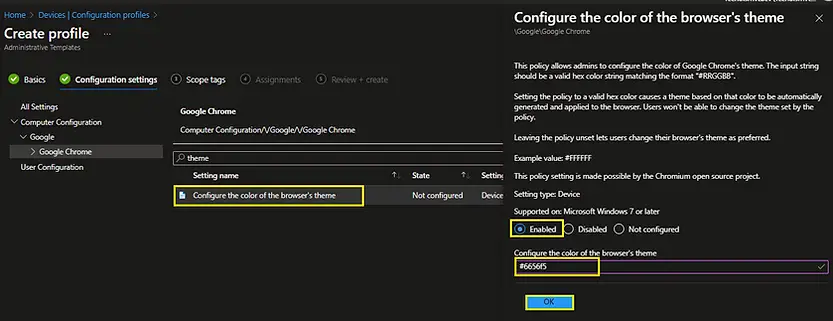
Configure the color of the browser’s theme
This is the last setting we picked for this demonstration. The setting will change the theme color of the Chrome browser.
Select Configure the color of the browser’s theme, select Enabled from the flyer display. Enter the hex color code in the Configure the color of the browser’s theme text box.
Click on Ok to return to the previous screen.
You can use the W3Schools link below to pick a hexadecimal color code.
https://www.w3schools.com/colors/colors_picker.asp
Now we are done with all the configuration. Click on All Settings to view the settings you have configured. All configured settings will appear on top.

Click on the Next button to move to the next page. Click on Next on the Scope tags page to move to the Assignments page.
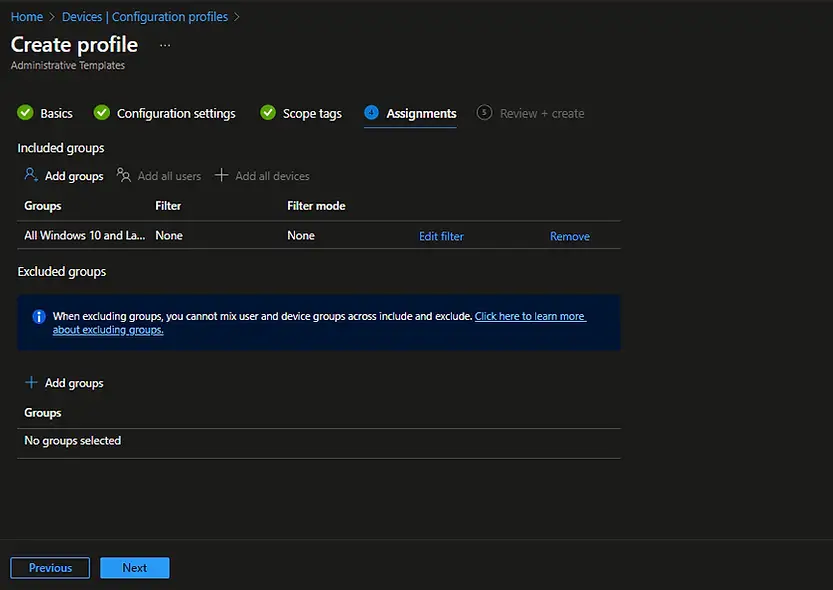
Assign the profile to an AAD group and click on Next
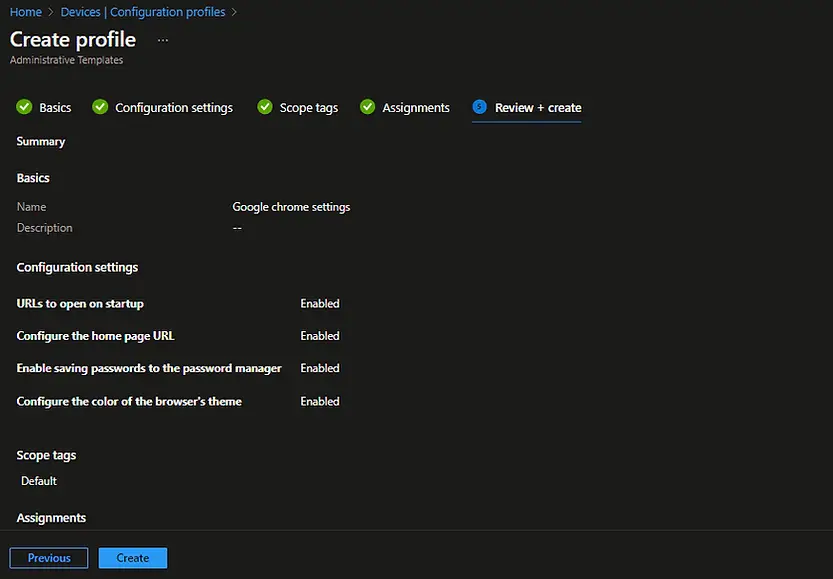
On the Review + create page, review the settings and click on Create.
You can view the notification area for a successful profile creation.
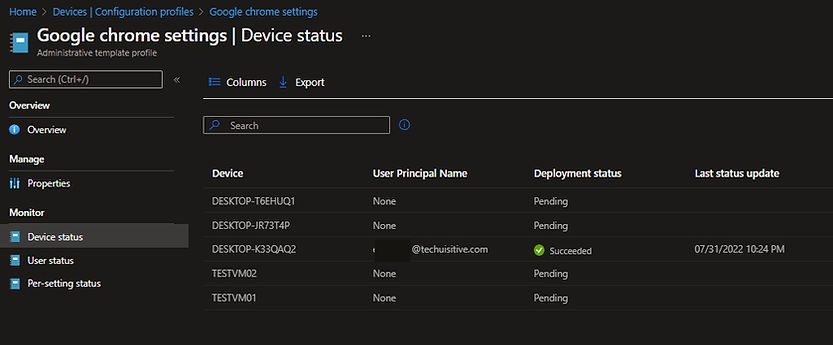
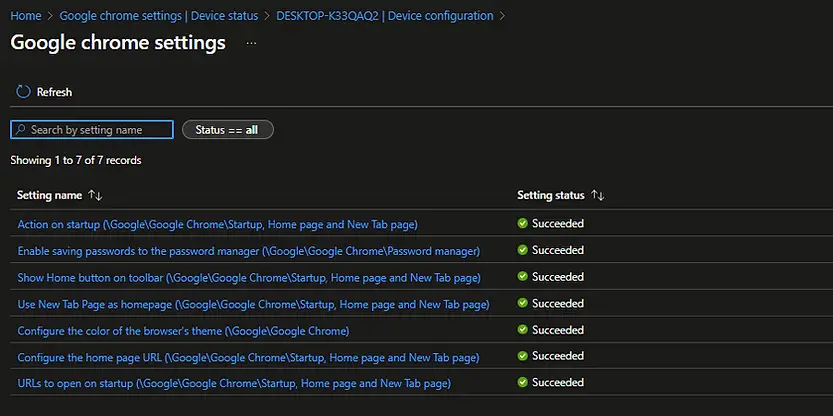
The Device configuration profile is now created. You can monitor the configuration status from Device configuration profile > Profile Name > Device status blade.
You can also check the configuration status of each setting for a device from Devices > All Devices > <Device name> \ Device Configuration > <Device configuration profile name>
Check the configuration status from the Event Viewer on the targeted device
Let’s see how we can validate the device configuration status from the Event Viewer on the targeted device.
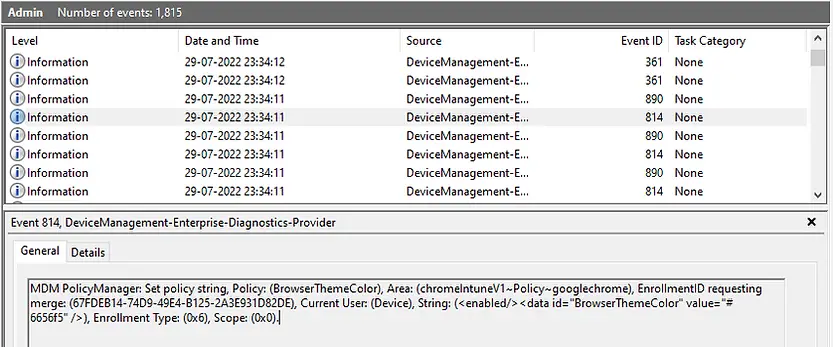
To verify the settings using Event Viewer, navigate to Applications and Services Logs \ Microsoft \Windows \DeviceManagement-Enterprise-Diagnostics-Provider\Admin.
You can see the following logs. We have captured the details for the browser theme color and Chrome startup page.
Event viewer: Browser theme color:
MDM PolicyManager: Set policy string, Policy: (BrowserThemeColor), Area: (chromeIntuneV1~Policy~googlechrome), EnrollmentID requesting merge: (67FDEB14-74D9-49E4-B125-2A3E931D82DE), Current User: (Device), String: (<enabled/><data id=”BrowserThemeColor” value=”#6656f5″ />), Enrollment Type: (0x6), Scope: (0x0).
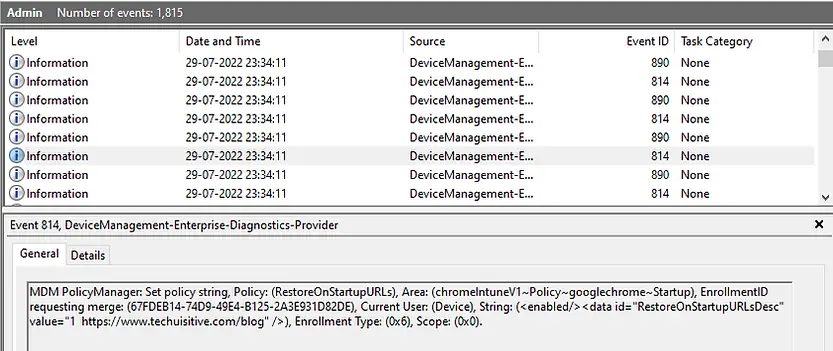
Event Viewer: Startup Page:
MDM PolicyManager: Set policy string, Policy: (RestoreOnStartupURLs), Area: (chromeIntuneV1~Policy~googlechrome~Startup), EnrollmentID requesting merge: (67FDEB14-74D9-49E4-B125-2A3E931D82DE), Current User: (Device), String: (<enabled/><data id=”RestoreOnStartupURLsDesc” value=”1
Check the configuration settings in Google Chrome
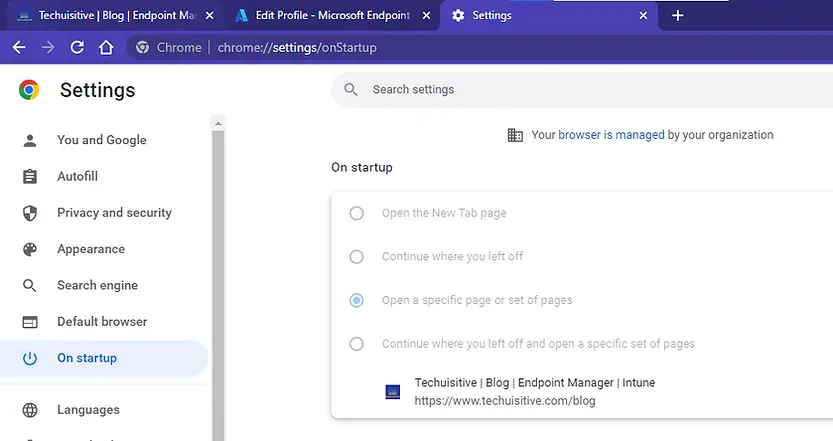
To verify the configuration from Google Chrome, open the Chrome browser and type chrome://settings in the browser address bar.
The following changes can be noticed here.
- Theme color: Google Chrome theme changed to blue, which is visible in the title bar and address bar. You can notice this by simply opening Google chrome.
- Startup page: You can see the startup page details in the On Startup tab. The startup page has been set, and the settings are grayed out. A user can’t change the settings.
- Home button: You can see home button on tool bar. When you click on the home button, it will take you to the home page you configured.
- Managed browser: Since you have applied the settings through Intune, you can also see a message “your browser is managed by your organization”.
List of Settings Available in Intune Google Chrome Administrative Template
Allow or Deny Screen Capture:
| Setting Name | Setting Type |
|---|---|
| Allow Desktop, Window, and Tab capture by these origins | Device / User |
| Allow or deny screen capture | Device / User |
| Allow Same Origin Tab capture by these origins | Device / User |
| Allow Tab capture by these origins | Device / User |
| Allow Window and Tab capture by these origins | Device / User |
Content Settings:
| Setting Name | Setting Type |
|---|---|
| Allow access to sensors on these sites | Device / User |
| Allow cookies on these sites | Device / User |
| Allow images on these sites | Device / User |
| Allow insecure content on these sites | Device / User |
| Allow JavaScript on these sites | Device / User |
| Allow JavaScript to use JIT on these sites | Device / User |
| Allow notifications on these sites | Device / User |
| Allow popups on these sites | Device / User |
| Allow read access via the File System API on these sites | Device / User |
| Allow the Serial API on these sites | Device / User |
| Allow WebUSB on these sites | Device / User |
| Allow write access to files and directories on these sites | Device / User |
| Automatically grant permission to sites to connect all serial ports. | Device / User |
| Automatically grant permission to sites to connect to USB serial devices. | Device / User |
| Automatically grant permission to these sites to connect to USB devices. | Device / User |
| Automatically select client certificates for these sites | Device / User |
| Block access to sensors on these sites | Device / User |
| Block cookies on these sites | Device / User |
| Block images on these sites | Device / User |
| Block insecure content on these sites | Device / User |
| Block JavaScript from using JIT on these sites | Device / User |
| Block JavaScript on these sites | Device / User |
| Block notifications on these sites | Device / User |
| Block popups on these sites | Device / User |
| Block read access via the File System API on these sites | Device / User |
Default search provider:
| Setting Name | Setting Type |
|---|---|
| Default search provider encodings | Device / User |
| Default search provider icon | Device / User |
| Default search provider keyword | Device / User |
| Default search provider name | Device / User |
| Default search provider new tab page URL | Device / User |
| Default search provider search URL | Device / User |
| Parameters for the image URL which uses POST | Device / User |
| Enable the default search provider | Device / User |
| List of alternate URLs for the default search provider | Device / User |
| Parameter providing search-by-image feature for the default search provider | Device / User |
| Parameters for the search URL which uses POST | Device / User |
| Parameters for search URL which uses POST | Device / User |
| Parameters for suggest URL which uses POST | Device / User |
Extensions:
| Setting Name | Setting Type |
|---|---|
| Blocks external extensions from being installed | Device / User |
| Configure allowed app/extension types | Device / User |
| Configure extension installation allow list | Device / User |
| Configure extension installation blocklist | Device / User |
| Configure extension, app, and user script install sources | Device / User |
| Configure the list of force-installed apps and extensions | Device / User |
| Extension management settings | Device / User |
Startup, Home page and New Tab page:
| Setting Name | Setting Type |
|---|---|
| Use New Tab Page as homepage | Device / User |
| Action on startup | Device / User |
| Configure the home page URL | Device / User |
| Show Home button on toolbar | Device / User |
| URLs to open on startup | Device / User |
| Configure the New Tab page URL | Device / User |
Password Manager:
| Setting Name | Setting Type |
|---|---|
| Enable saving passwords to the password manager | Device / User |
| Enable leak detection for entered credentials | Device / User |
Safe Browsing Settings:
| Setting Name | Setting Type |
|---|---|
| Configure the change password URL. | Device / User |
| Configure the list of domains on which Safe Browsing will not trigger warning. | Device / User |
| Configure the list of enterprise login URLs where password protection service should capture salted hashes of passwords. | Device / User |
| Enable Safe Browsing Extended Reporting | Device / User |
| Password protection warning trigger | Device / User |
| Safe Browsing Protection Level | Device / User |
Printing:
| Setting Name | Setting Type |
|---|---|
| Default background graphics printing mode | Device / User |
| Default printer selection rules | Device / User |
| Default printing page size | Device / User |
| Disable Print Preview | Device / User |
| Disable printer types on the deny list | Device / User |
| Enable Google Cloud Print proxy | Device / User |
| Enable printing | Device / User |
| Enable submission of documents to Google Cloud Print | Device / User |
| Print Headers and Footers | Device / User |
| Print PDF as Image Available | Device / User |
| Print PostScript Mode | Device / User |
| Print Rasterization Mode | Device / User |
| Print Rasterize PDF DPI | Device / User |
| Restrict background graphics printing mode | Device / User |
| Use System Default Printer as Default | Device / User |
Related Posts:
- Understanding Windows Autopatch with Intune
- Manage Edge Chromium favorites with Endpoint Manager | Intune
- Configure Edge Chromium Homepage & Startup Page
- Configure Microsoft Edge Sleeping Tabs using Intune
- Configure Google Chrome settings using Administrative templates | Intune | Endpoint Manager
- Block USB Device with Exception
- Deny Write Access to USB Devices Using Intune Catalog Settings
- Manage Windows 10 /11 Desktop Wallpaper with Microsoft Intune
- Manage Local Admin Password with Intune & Windows LAPS
- How to Create a Custom RBAC Role in Intune for LAPS Password Administrator
Subscribe to Techuisitive Newsletter
Be the first to know about our new blog posts. Get our newsletters directly in your inbox and stay up to date about Modern Desktop Management technologies & news.