SCCM allows application deployment in way that it goes through approval process. Users requests the application in Software Center, and then an administrator review and approve user application requests. The feature is named Approve application requests for user per device and it’s not enabled by default in Configuration Manager.
We will explore this feature and steps required to deploy application which goes through approval process.
Enable Optional Features
The feature to approve user application requests is not enabled by default in ConfigMgr. You need to enable the feature if you want to use the same. Follow the below process to enable the option.
- In the ConfigMgr console, navigates to Administration / Updates and Servicing / Features
- Right click on Approve application requests for user per device and select Turn On

Configure Email Notifications for Alerts in SCCM
SCCM has an ability to sent an email for triggered alerts. The email notification can also configured for subscribing SCCM reports periodically.
An admin needs to approve the application requested by the user. A SCCM administrator can approve the application request from ConfigMgr console. However this method may not be convenient if you want to delegate the approval of an application to application owner or someone from business / Helpdesk rather than SCCM team own the approval task.
We have an option to configure the email notification for each application. Once user request an application, email will be sent to respective email address to approve or deny the request. The email recipient can approve or deny the application by clicking on Approve / Deny button in the email. The person must have necessary access in SCCM to approve / deny application requests. Please refer to custom RBAC role section of this article.
To receive an email from SCCM you must configured email notifications. If you are using report subscriptions then this must be in place already.
Follow the below steps if this is not configured.
- In the SCCM console, navigates to Monitoring / Alerts / Subscription
- Click on Configure Email Notification in ribbon

- Configure the following options the Email Notification Components Properties window. You can get in touch with your Exchange / Mail server team to get necessary details.
- Enable email notification for alerts : Provide outgoing SMTP server details to send email
- Sender address for email alerts: Provider sender email address for email alerts

Create Custom RBAC Role
In Configuration Manager, role-based administration combines security roles, security scopes, and assigned collections to define the administrative scope for each administrative user. An administrative scope includes the objects that an administrative user can view in the Configuration Manager console and the tasks related to those objects that they have permission to do.
This step is required if you want to delegate the application approval tasks to Application Owner or someone else who is not a Configuration Manager administrator. You can assign this role to an Active Directory Group for better management.
- To create a custom RBAC role for application approval:
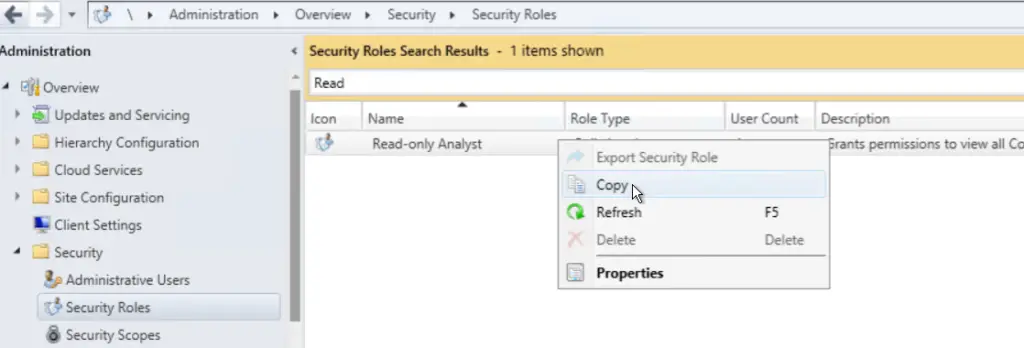
- navigates to Administration / Security / Security Roles
- Right click on Read only Analyst role and select Copy

- Provide a name for new security role, Expand Application in Permissions list and select Approve.
- Click on Ok to close the Window.

The new security role is now created. Now, we need to assign the administrative user’s / groups to newly created security role.
Navigates to Administrative Users node, right click on the desired user / group and select properties.

In the Security Roles tab, click on Add, Select newly created security role and click on Ok to assign the role to administrative user.

Setup Application Deployment
The next step is to setup an application deployment. We will setup a deployment as ‘Available’ to user’s collection. The user’s can see the application in Software Center and request application installation from there. If the administrator approves the request, the user is only able to install the application on that device. The user must submit another request to install the application on another device.
Let’s understand how we can setup a deployment and configure approval requirements. We will not discuss the steps to create an application. We assume that you are well familiar with SCCM application creation and deployment process.
Create User Collection
Since the application need to be deployed on User collection, let’s create user collection first.
- In the Configuration Manager console, navigates for Assets and Compliance / User Collection
- Right Click on User Collections and select Create User Collection

- In the Create User Collection Wizard, General page, enter Collection Name, Limiting collection and click on Next.

- Click on Add Rule and select Direct Rule. We will add a test user directly in this collection. You can also user Query Rule, Device Category Rule, Include and Exclude collection Rule to populate collection membership dynamically.

- In the Search for Resources page, enter the user name which you want to search and click on Next.

- In the Select Resource page, select the user’s which you want to add to collection and click on Next.
- Click on Next few more times to go through Summary, progress and Completion page.

You can now see that collection created and membership populated.

Deploy Application to User Collection
Now we need to deploy the application to user collection. We will deploy 7 Zip application to the user collection we created in previous steps.
- Right click on the Application which you want to deploy and select Deploy from context menu.
- In the Deploy Software Wizard General page, select the Software and Collection. Click on Next.

- In the Deployment Settings, make sure following settings are configured:
- Action : Install
- Purpose : Available
- Select An administrator must approve a request for this application on the device
- Enter Approver email address
- Click on Next and configure Scheduling, User Experience options as per your requirements.
- Click on Next few more times to go through Summary, Progress and Completion page to complete deployment setup process.
Please note that you must select An administrator must approve a request for this application on the device check box. Otherwise the approval process will not enforced for the deployment.

The deployment setup is now completed and application will be visible to user’s in Software Center.
Request an Application from Software Center (End User)
User can now see the application in Software Center. Once user click on the application, they see will below screen. User can click on Request button to submit application installation request.

If user submitted the request in error, they will also have an option to cancel the request.

Approve User Application Requests from SCCM Console
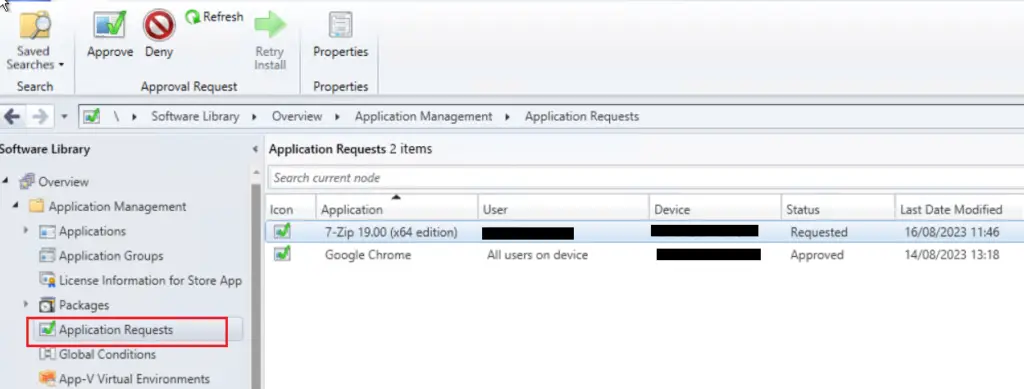
The Configuration Manager administrators can see the application requests in SCCM console. To view all requests, you need to navigates to Software Library / Application Management / Application Requests
To approve or deny an application request, simply select the application and click on Approve / Deny button from ribbon.

Approve User Application Request from Email Notification
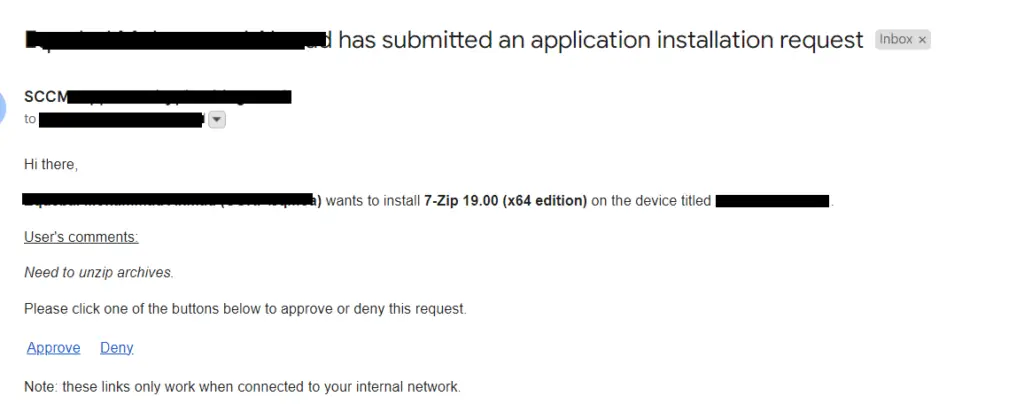
If you have configured the SCCM environment for email notification alerts and provided an approver’s email address while creating the deployment, then approver’s will receive below email notification to approve or deny the request.
The below link will work from internal network only and SCCM server should be accessible from approver’s machine.
If you have Cloud Management Gateway (CMG) configured in your SCCM environment, then you can also configure approval from Internet. Check out this Microsoft article for more details.

Once approver click on the Approve / Deny link, he / she can see a confirmation message whether approval or rejection was succeeded.

Related Posts
- Configure Management Point for HTTPS | ConfigMgr | SCCM
- Configure Software Update Point for SSL | ConfigMgr | SCCM
- Deploy client authentication certificate for SCCM clients
- SCCM CMG Part 1 | Cloud Management Gateway (CMG) Setup Guide
- SCCM CMG Part 2 | Issue, Enroll & Export Server Authentication Certificate
- SCCM CMG Part 3 | Configure SCCM Site for SSL
- SCCM CMG Part 4 | Integrate Azure Active Directory with ConfigMgr
- SCCM CMG Part 5 | Setup Cloud Management Gateway
- SCCM CMG Part 6 | Validate CMG Health & Client Communication
- Location of smsts.log file during Operating System Deployment (OSD)
- Schedule SCCM Client Reboot through ConfigMgr
- Check Software Center Business Hours of Remote Computer
- SCCM Software deployment strategy
- How to deal with wrong deployment in ConfigMgr
- How to Initiate SCCM client agent actions using PowerShell
Subscribe to Techuisitive Newsletter
Be the first to know about our new blog posts. Get our newsletters directly in your inbox and stay up to date about Modern Desktop Management technologies & news.