Issuing and enrolling Client Authentication Certificates for SCCM clients is a critical step in enabling secure communication and compliance within Configuration Manager. This guide provides a clear, step‑by‑step walkthrough on how to configure certificate templates, enable auto‑enrollment via Group Policy, and ensure SCCM clients receive the required certificates seamlessly. By following these instructions, administrators can establish a reliable PKI foundation for SCCM operations.
A client certificate is also required on any computer that will be managed via the Cloud Management Gateway ( CMG ), and devices are not Azure AD / Hybrid AD-joined. It is also required on the server that will host the Cloud Management Gateway connection point.
Let’s understand how we can issue a client authentication certificate using Microsoft Active Directory Certificate Services (Public Key Infrastructure / PKI) and configure auto-enrollment via Group Policy.
How to Issue a Client Authentication Certificate from Microsoft PKI
RDP to Certificate Authority Server
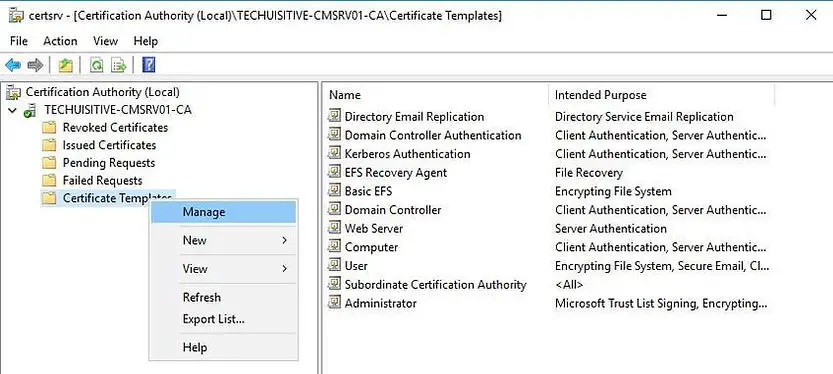
On the Certificate Authority console, right-click Certificate Template and click Manage.
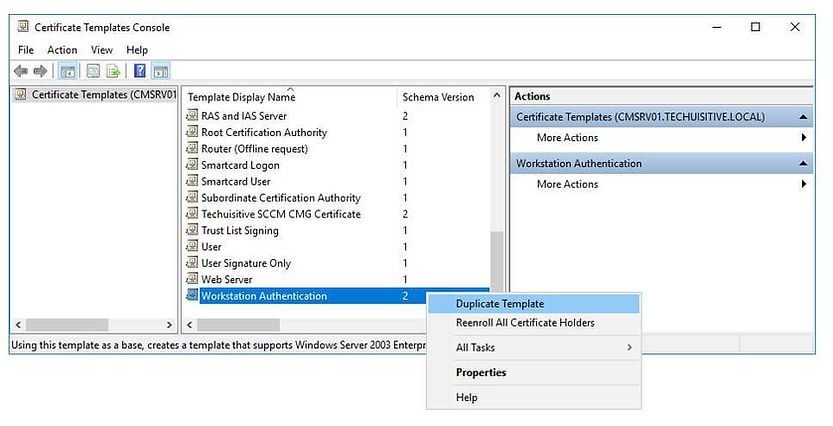
Right-click Workstation Authentication and click Duplicate Template.
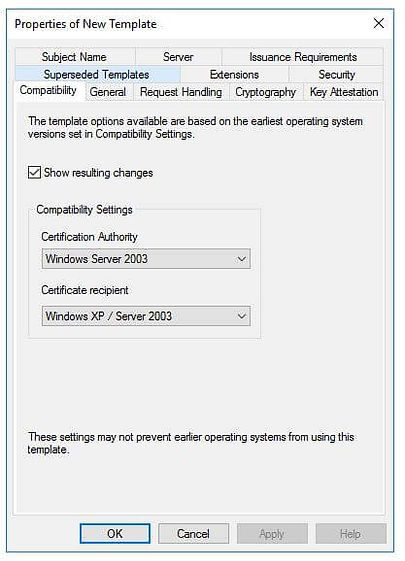
Under the Compatibility tab, make sure to use to Windows Server 2003 under the Certificate Authority option.
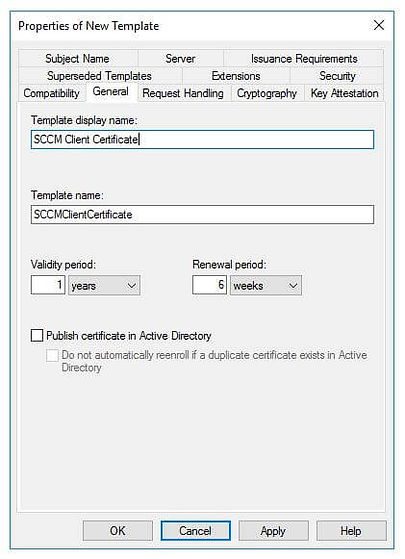
In the General tab, enter SCCM Client Certificate under the Template display name. Set the validity period as per your requirement.
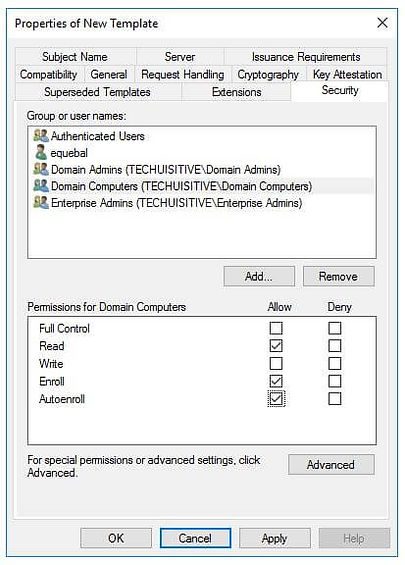
Click on the Security tab, select the Domain Computers group, and add the permission of Read and Autoenroll, do not clear Enroll. Then click on Ok
Refresh the console and check if the new template is there
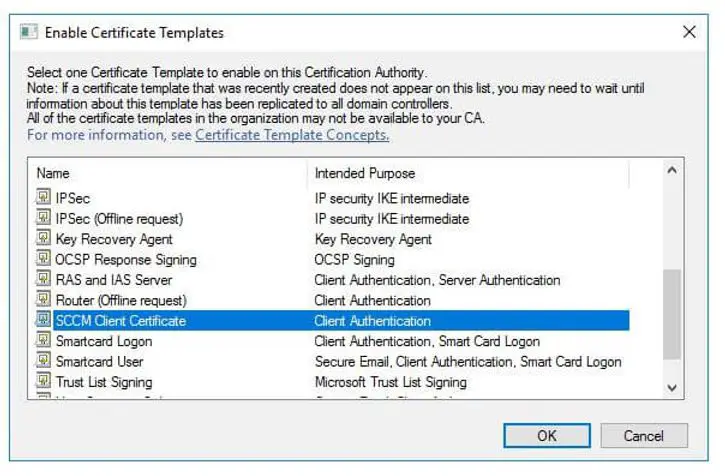
In the Certificate Authority console, right-click Certificate Templates, choose New, and then choose Certificate Template to Issue.
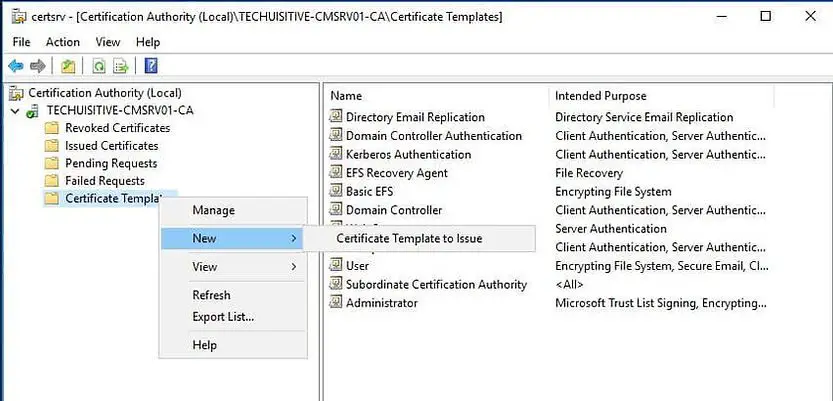
In the Enable Certificate Templates dialog box, choose the new template that you just created, ConfigMgr Client Certificate, and then choose OK.
Configure Client Authentication Certificate Auto Enrollment
The fastest way to deploy the client certificate to all your machines is through an auto-enrollment GPO. Follow the process below to configure the auto-enrollment group policy.
Launch Group Policy Management on your Domain (Start / Administrative Tools / Group Policy Management)
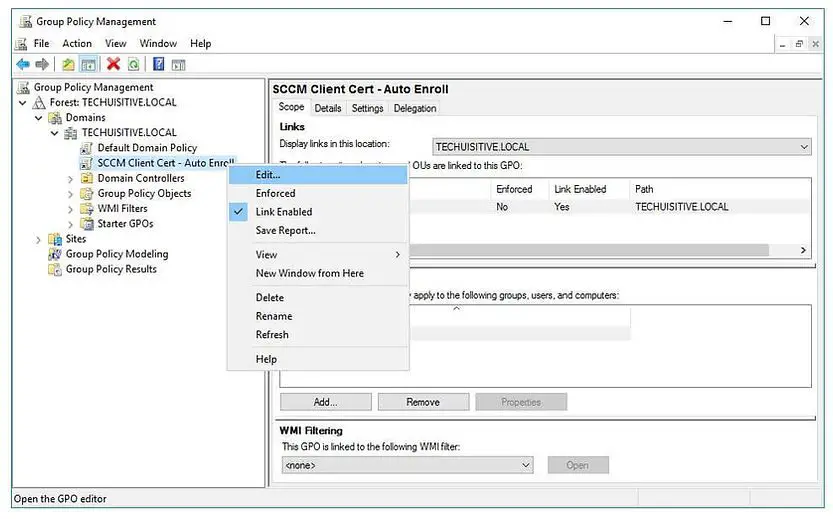
Right-click the desired OU and select Create a GPO in this domain, and Link it here…
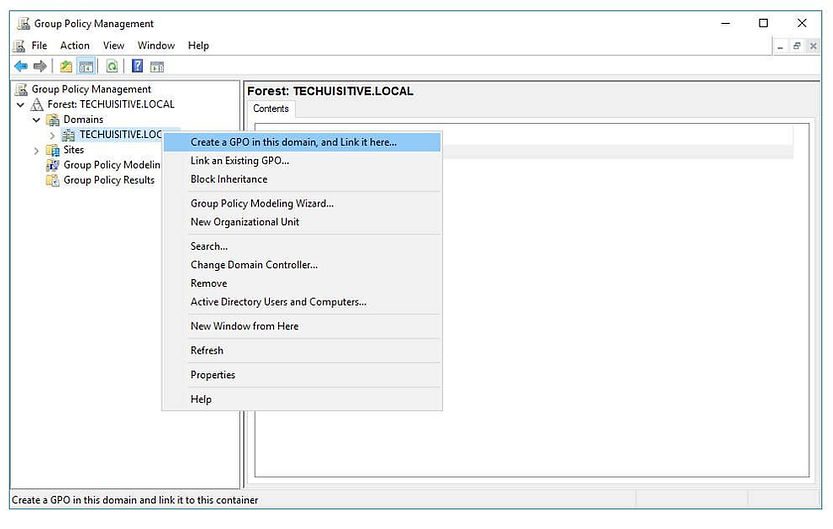
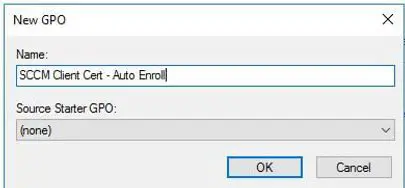
Name your GPO SCCM Client Cert – Auto Enroll, then click OK.
A blank GPO will now be created. Right-click and edit your newly created GPO.
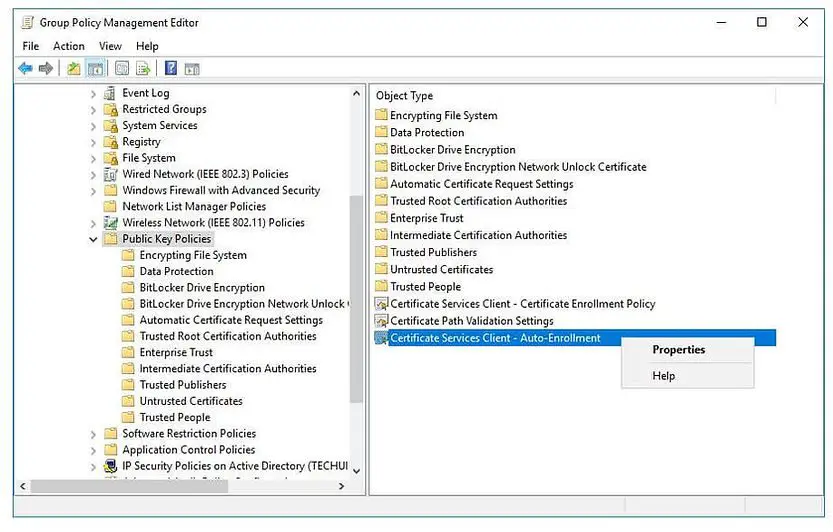
Navigate to: Computer Configuration / Policies / Windows Settings / Security Settings / Public Key Policies
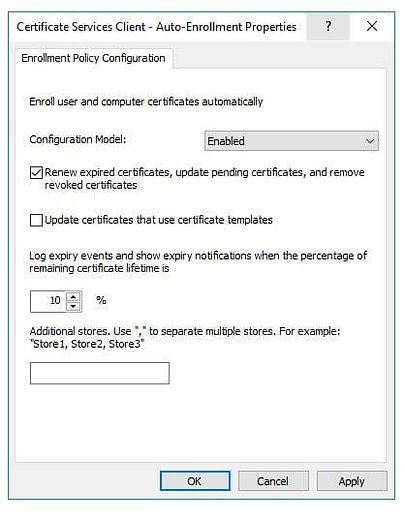
Right-click on Certificate Services Client – Auto-Enrollment and then click Properties
Change the Configuration Model: to Enabled
Select the Renew expired certificates, update pending certificates, and remove revoked certificates checkbox
Click Apply and OK
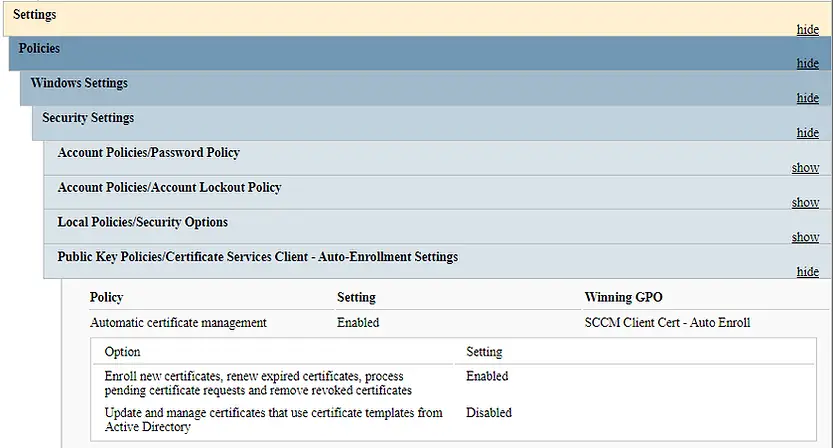
The group policy is now configured for auto-enrollment. When Group Policy is reapplied, any machine on the domain that communicates with the Domain Controller will automatically request and receive a client authentication certificate.
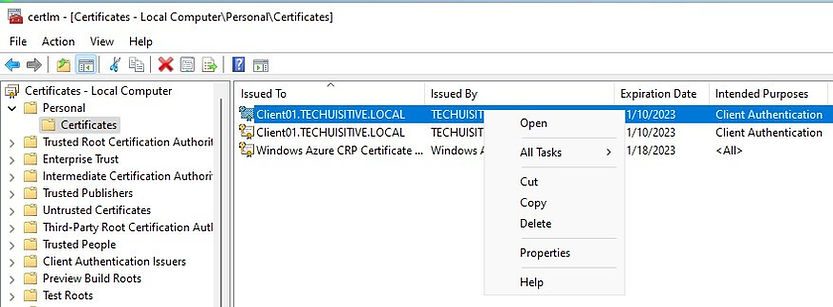
On the client machine, the certificate will be placed in the Local Computer Personal Certificate Store
To expedite testing, you can reboot the workstation and run the gpupdate /force command to force an update of the Group Policy.
Below is the result from the GPRESULT command. You can see that GPO has been applied, and SCCM Client Cert- Auto enroll is winning GPO.
How to Export Trusted Root Certificate
When configuring SCCM for SSL, the trusted root certificate must be provided to the site server. This certificate is also required during the setup of the Cloud Management Gateway (CMG) to establish secure communication. Follow the steps below to export the trusted root certificate from a workstation that has enrolled the Client Authentication Certificate via Group Policy (GPO).
Go to Run and type certlm.msc and press Enter to open the local computer certificate store.
Right-click on the client authentication certificate and select Open
In the Certificate page, select the highest certification path and click on View certificate.
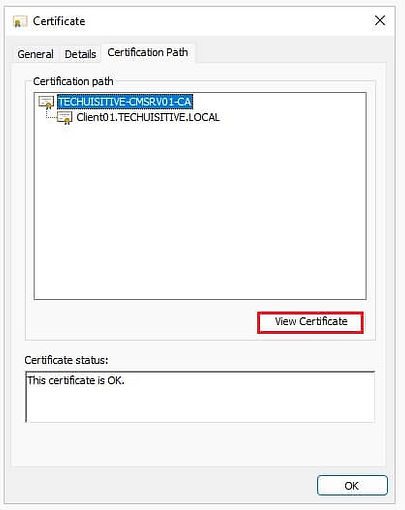
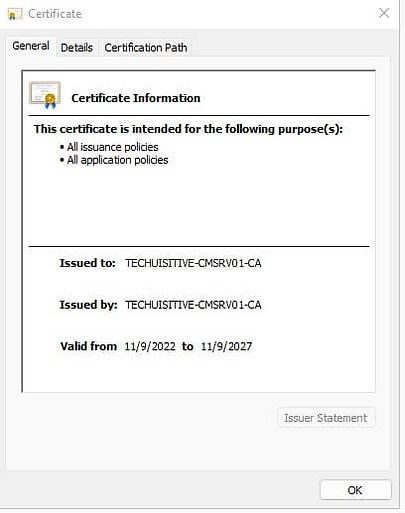
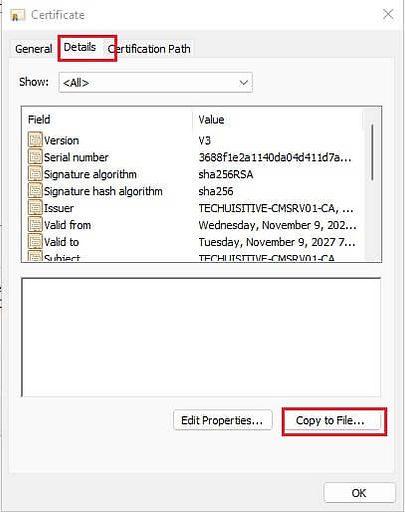
The Certificate Information page will open in a new window
Click on the Details tab and then click on Copy to file…
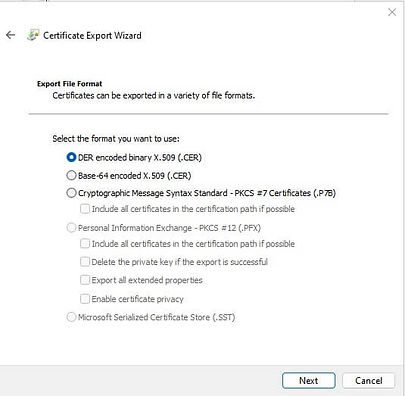
On the Welcome to the Certificate Export Wizard page, click on Next
On the Certificate Export Wizard page, ensure that DER conded binary X.509 (.CER) format is selected.
Click on Next
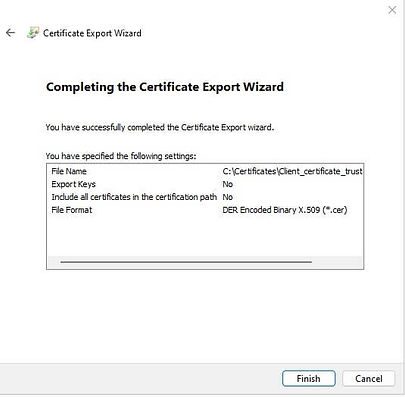
Provide the name for the file and click on Next

On the Completing the Certificate Export Wizard page, click on Finish.
Conclusion
Issuing and enrolling Client Authentication Certificates in SCCM is a vital step for enabling secure communication, compliance, and seamless management of clients. By configuring certificate templates, enabling auto‑enrollment through Group Policy (GPO), and exporting the trusted root certificate for SSL and Cloud Management Gateway (CMG), administrators can build a reliable PKI foundation for Configuration Manager. Following this step‑by‑step process ensures that SCCM clients consistently receive the required certificates, strengthening both security and operational efficiency in your environment.
Related Posts:
- Configure Management Point for HTTPS | ConfigMgr | SCCM
- Configure Software Update Point for SSL | ConfigMgr | SCCM
- Deploy client authentication certificate for SCCM clients
- SCCM CMG Part 1 | Cloud Management Gateway (CMG) Setup Guide
- SCCM CMG Part 2 | Issue, Enroll & Export Server Authentication Certificate
- SCCM CMG Part 3 | Configure SCCM Site for SSL
- SCCM CMG Part 4 | Integrate Azure Active Directory with ConfigMgr
- SCCM CMG Part 5 | Setup Cloud Management Gateway
- SCCM CMG Part 6 | Validate CMG Health & Client Communication
- Location of smsts.log file during Operating System Deployment (OSD)
- Schedule SCCM Client Reboot through ConfigMgr
- Check Software Center Business Hours of Remote Computer
- SCCM Software deployment strategy
- How to deal with wrong deployment in ConfigMgr
- How to Initiate SCCM client agent actions using PowerShell
Subscribe to Techuisitive Newsletter
Be the first to know about our new blog posts. Get our newsletters directly in your inbox and stay up to date about Modern Desktop Management technologies & news.